

This article from Alan Ray is Part 3 in a 3 part guide to playing SPQR. If you would like to read Parts 1 and 2 first, you can find those here and here.
Heraclea Opening Moves
The last section of this article features an “real world” example of play focusing on the first game turn’s action on the Epirote left wing. Cavalry units are the only unit Type present and there is no missile combat. However, just about every other game mechanic is represented providing a good example of typical play.
Game Turn 1 Elite Initiative Orders Phase
The Roman player (me) decides to take advantage of the scenario special rule and use the Elite Initiative Orders phase (EIO) to enter his right-wing cavalry on the Epirote side of the river to set up an assault on the Epirote left wing cavalry. There is no Momentum in the EIO phase, but Drusus will be able to go again when it’s his turn in line. With the EIO phase out of the way, play proceeds with the Roman player taking turns with each of his 2-rated leaders. He decides to pass with Plautus since the Triarii can’t move and although Plautus could order the Principes line, there is no need to do that now since there is 3-rated leader in position to do the same. Rebilus, however, issues a Line Command to send the Velites line forward – I will leave out the details and jump to the 3-rated leaders. Since both sides have 3-rated leaders it’s a die roll to see who goes first. This turns out to be a critical event given the special circumstances in the scenario. If the Epirotes win the die roll, Pyrrhus will have an opportunity to Trump his 3-rated leader and respond to the looming Roman attack. He has an 80% chance of success, but the Epirotes have but a 50% chance to go first; net 40% chance to steal a march on the Romans. This, of course means the Romans have a 60% chance to pull off a nasty assault which for this discussion we will assume occurred.

Game Turn 1 Roman Player Turn with Drusus
Movement and Missile Fire Segment
The Roman player has won the die roll contest and turns his player turn over to the capable Drusus. This is his Initial Orders phase even though he went in the EIO phase. And, since it’s the first Game Turn, a Line Command is automatic, which he then proceeds to issue. This is the second time the Roman cavalry units have moved in the Game Turn, so all are “awarded” 1 Hit.
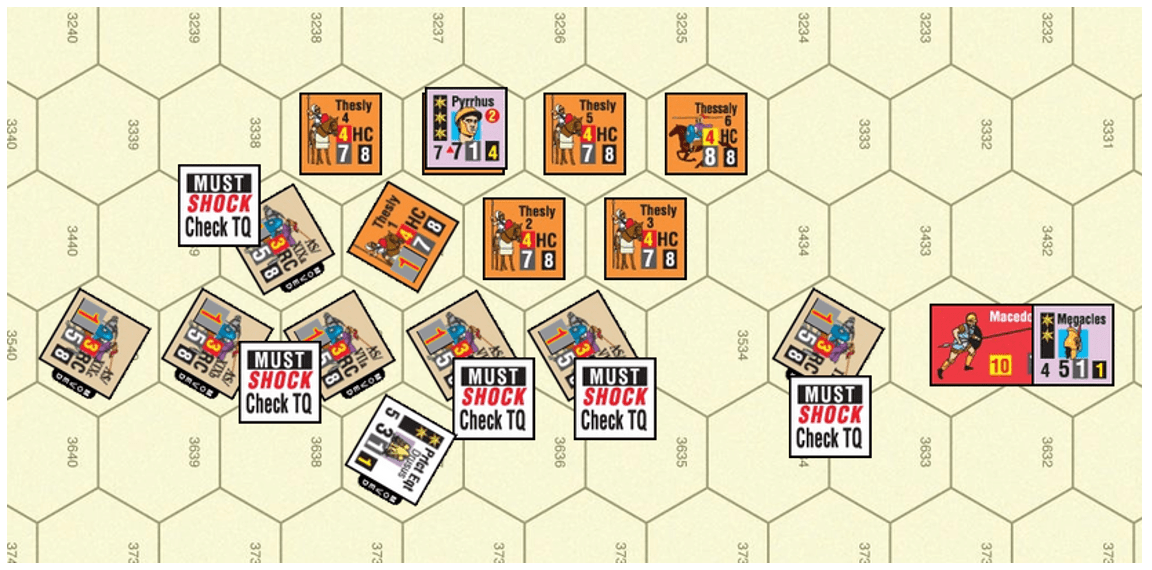
As much as the Roman player would like to pull a Hannibal and perform a double envelopment on the Epirote horse, a look at Shock Superiority Chart shows that this is bad idea. Type HC units are Defender Superior (DS) against an attacking RC type unit. None of the Roman RCs would survive incurring three times the Hits in a frontal attack. So, the Roman player moves his units to generate as many Position Superiority attacks as possible, which negates the DS and grants Attacker Superior (AS – inflicts twice the number of Hits) status to the attacking unit. The rightmost RC can reach the flank of the leftmost Phalanx unit so does so. The next four RC in turn move into position behind the rear three HC and the left most front HC unit. There is nothing stopping the Romans from sliding along the rear of those units. The Reaction facing change is only one vertex and can only be done once per Orders Phase. For two of the rear Epirot units such a change doesn’t do much good, so the Epirote player declines to incur the minimum 1 Hit at the cost of using Column 9 (Rear angle) on the Shock CRC, rather than Column 8 (Flank angle). The leftmost rear HC can put a ZOC on the flank hex of the front-line unit, so the Epirote player makes the facing change here. The actual RC moves are a bit tricky due to the need to avoid that ZOC. Recall that that there is a 1 MP cost for cavalry to change facing by one vertex. Since a unit can only move into one its two front hexes, going from point A to point B can be costly when moving around obstacles such as enemy ZOCs.
The Roman player kept Drusus out of the fight and positioned him so that all his units are within Command Range so that he would be able to give orders and place Shock markers should he gain another Orders Phase via Momentum. The diagram below shows the situation at the end of the Movement and Missile Fire segment.
Shock Combat Segment
On to the Shock Combat section. For the Shock attack designation, the Roman player chose all one-on-one attacks, which I believe is the optimal allocation in nearly all situations. Starting with the AS XIXa RC on the left and moving to the right the Romans have one rear attack, a flank attack (the facing change helped the HC here), two Rear attacks, and a flank attack on the Phalanx. All are moving attacks so there are Pre-Shock checks for all.
The Charge: Pre-Shock TQ Checks
When playing solitaire, I like to roll different colored dice for these checks (even when playing on Vassal!). I did so for this example and well, it was a rather bloody. A lot of Hits to go around with the Romans on the losing end. The Roman RC attacking then Phalanx headed for home (DR of 9 – the Hit for moving more than once the deciding factor) while two other RC incurred 3 Hits, which with a glance over to the Shock CRC, guarantees that they will soon follow their compatriot. The Epirotes despite their high TQ suffered 4 Hits. TQ matters! The diagram below shows the situation after the Pre-Shock TQ checks.

The Hand-to-Hand Struggle
There are no leaders to check for casualties. The four remaining combats will be resolved in the same order as the Pre-Shock TQ checks, starting with AS XIXa RC on the left and moving to the right. For all four attacks, the Epirote Size advantage is negated because the RC moved into a hex adjacent to the HC to attack. There are no other applicable shifts nor are there any DRMs. Consulting the Clash of Spears and Swords Chart, the Rear attacks will be resolved on the Column 9, while the Flank attack on Column 8. All attacks are AS due to the RCs’ Position Superiority. The die rolls produce a 2(3), 3(2), 3(2), and 2(3). The AS doubles the defender’s Hits. For convenience, I place a Rout marker all units with Hits the same as or more than their TQ. Their rout move will come in the next step.

The Collapse
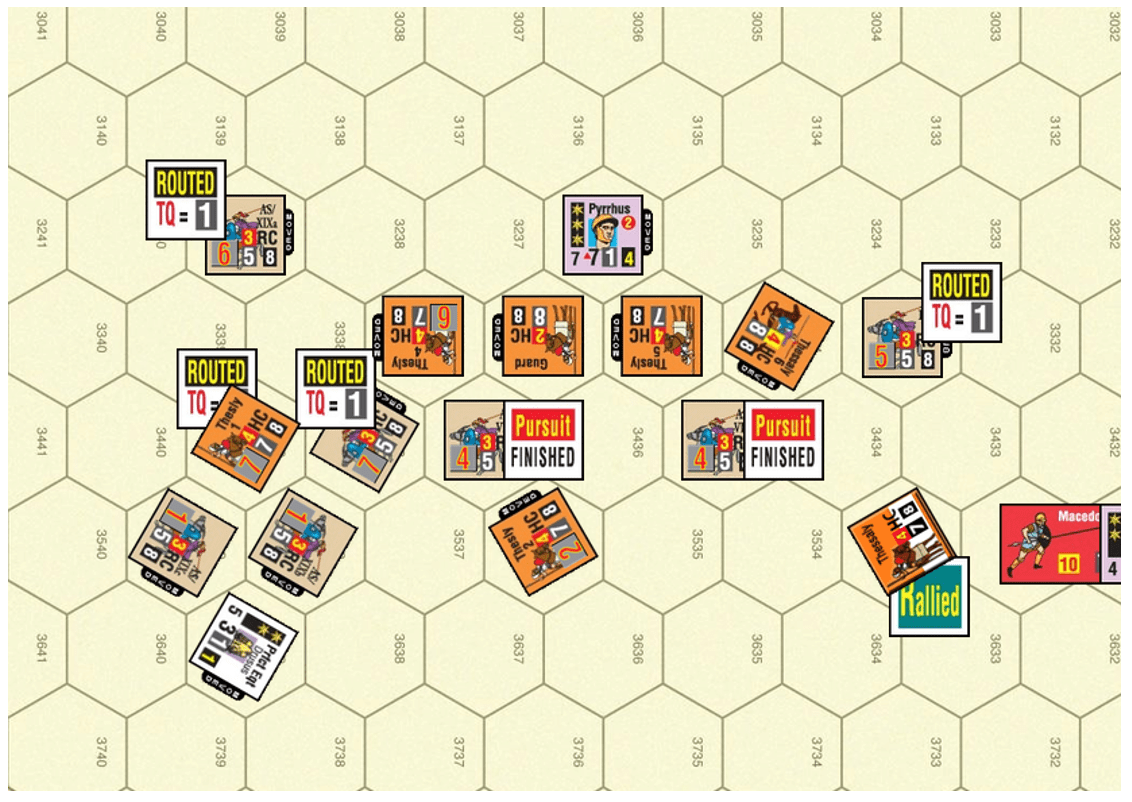
With the Hits allocated, it’s time to move the routed units, then to see if any units close to rout head home as well. Starting again on the left, the first combat is an “everybody routs” situation (SPQR 10.15). The Roman RC exceeded its TQ by more than the Epirote HC, so it routs and the Epirote HC has its Hits set to 6 (one less than its TQ). The RC faces towards the Roman retreat edge (top of diagram) and moves two hexes in that direction scooting past its opponent. Routed units have a facing and move in the same manner as unrouted units according to the priorities described in SPQR 10.22. In this case, there one legal path for its two-hex move, the other blocked by an enemy unit and an enemy ZOC.
A routing Epirote HC is next to move. Its path to its retreat edge (bottom of the diagram) is blocked by Roman units so it will move laterally to avoid them. Here is where the emphasis on a consistent and orderly method for resolving the combats pays off. The Roman RC has moved away providing an avenue for the HC. And, as it turns out, the HC creates a path for the remaining routed RC which follows the HC. The last to rout move is a HC which will need to move around its attacker’s ZOC. After addressing the routs, the next “to do” in the Collapse sequence is to conduct a TQ check for each combatant that is within one Hit of rout and in an enemy ZOC. The two surviving RC are at that threshold but are not in an enemy ZOC so there is no rout check.

The final item in the Collapse step is to advance the successful attackers to hexes vacated by the defenders. But we are dealing with cavalry here, so we must instead determine if the attackers pursue (SPQR 8.6). For this discussion, I will use the optional Pursuit rule; the mechanics are the same, the difference is that pursuit check is made against a Pursuit Rating based on cavalry type with some possible DRMs, rather than the unit’s TQ. Both attacking RC meet the requirements for cavalry pursuit (SPQR 8.61) so starting with the leftmost RC, the Roman player rolls the die and compares it to the RC Pursuit Rating (3). None of the DRMs apply. The roll here is 2 which means that the RC Breaks Off; it advances into the vacated hex where it changes facing by one vertex. The Roman player must also place Pursuit/Finished on the unit. A unit in this state cannot be ordered to move or fire but may be ordered to recover Hits. The Pursuit/Finished unit cannot Shock attack, but may react (6.5, 8.2, etc.) and defend normally (SPQR 8.63). Now the Epirote player has the option of performing a reaction facing change with one or both HC that are now adjacent to the advancing RC but sees no point in incurring the Hit(s).
For the next RC, another low roll (3), means another Break-Off with an advance and a facing change and the placement of a Pursuit/Finished marker. The Epirote player once again declines to react. In both cases, the Break-Off result was likely a blessing, since each would have been forced to attack a pair of HCs, including a Pre-Shock TQ check. Both would have routed, with the one distressed (6 Hits) HC likely doing so as well. Note that the Epirote player decided to withdraw Pyrrhus in the face of the advancing RC to avoid being placed in an enemy ZOC. Not critical for an OC, since he could order himself out, but that order may come in handy for something else. The diagram below shows the situation and the end of the Shock Combat segment.

The Roman player can try for one Momentum attempt (would be his third Orders Phase if he succeeded), which would most certainly prompt a Trump attempt by the Epirote player. The chance of getting another go is less than 10%. If he did succeed, what would he do? He has two unengaged RC that he could move (costs another Hit) to finish off the two routed HC. He has one Rally opportunity (AS XIXa). He could not recover Hits from the two Pursuit/Finished RC since they are adjacent to an enemy unit, and incapable of doing anything else due to their status. Worth the try for the Momentum? Maybe, but for this discussion, Drusus failed in his attempt and is now done for the Game Turn.
Game Turn 1 Epirote Player Turn with Pyrrhus
Let’s move forward to see how Pyrrhus will clean up the mess on his left flank. The Epirote player has the next Player Turn with one of his 3-rated leaders. The players then alternate with the remaining 3-rated leaders. The Epirotes have the only 4-rated leader, so he goes, then the player’s roll to see whose 5-rated leader goes next. On this first Game Turn the players will be moving their forces along the lines discussed in the Battle Plan section with no significant impact on the cavalry action on the flank. Now we come to Pyrrhus who is last in line.
Movement and Missile Fire Segment
The Epirote player has several different things to do so he will have Pyrrhus use Individual Orders. The first order of business is a series of Move orders to get his horse facing towards the enemy. SPQR 7.24 is the key rule here. The four front line HC are in the ZOC of a single Roman RC, and none have an enemy unit in their ZOC. All four can use up 4 MP to change facing if they remain in the hex. Pyrrhus issues a Move order to Thessaly 6 to change facing two vertices (2 MP), and a Move order to Thessaly 5, his Guard, and Thessaly 4 to reverse face (3 MP). The Epirote player would have liked to remove Hits from the Thessaly 6 rather than move the unit, but the unit is adjacent to an enemy unit. Routed units may not have a ZOC, but they do count as any other unit for adjacency purposes. No Shock markers are placed since none of the units moved adjacent to an enemy unit from a non-adjacent hex; there is no charge going on here.
Four orders expended, three to go. Order number five is a Move order to Thessaly 2 (removing Hits is not an option). Recall that friendly units negate enemy ZOC when tracing an order path (SPQR 4.21). Moreover, the HC though betwixt to Roman units is not in a ZOC, so can go where the player wants. What to do? Since this is Pyrrhus’ initial orders phase and he likely to earn one or two more, there is no need to rush into anything. Furthermore, the Game Turn ends with Pyrrhus, and as an Elite leader, the Epirote player can take the first Player Turn of the next Game Turn using Pyrrhus. Thessaly 2 changes facing two vertices and that player announces that the HC will move toward Drusus, who promptly withdraws 1 MP (leaders have a 9 MA). The HC moves forward one hex, and Drusus again withdraws, and the HC ends its move.
With two orders left, the Epirote player would like to rally his two routed units. Both are in range, but only one is eligible (the other is adjacent to some Romans). Order number 6 is a Rally to Thessaly 3. Pyrrhus needs a DR of anything but a 9 (<= Initiative Rating +1) to rally and the player rolls an 8. The Routed marker is flipped to its Rallied side, the unit flipped to its Depleted side, and the player rolls again on the Rally Table (a 2) and gives the unit 2 Hits. A rallied unit can be refaced in any direction, so the Epirote player does just that. The Epirot player could use his last order to move Pyrrhus but decides to leave him where he is. The diagram above shows the situation at the end of the segment.
Shock Combat Segment
On to the Shock segment. The Epirote player marks the four HC that changed facing with Shock markers and allocates each to attack a separate RC. There is no Pre-Shock TQ check (unfortunately since that is the easy way to dispense with routed units) and no leader casualty check.
The Hand-to-Hand Struggle
As was done with the Romans, the combats will be resolved from left to right. Thessaly 4 has a flank attack on the routed AS VIIb, no shift for Size (not a charge) and no other shifts; result a 2(2) upped to 2(4) due to AS from Position Superiority. The Guards frontal, attack will be resolved on Column 6 due to its Size disadvantage; result 2(2). The Thessaly 5 frontal attack is resolved on Column 7; result 3(2); Finally, the flank attack by Thessaly 6 produces a final 2 (3) upped to a 2(6).
The Collapse
Now for the routs. The Thessaly 4 combat ended in a ‘everybody routed” situation. The routed RC exceeded its TQ of 1 by more than his opponent, so it routs and is eliminated. Units that Rout do not retain their Hits; the 4 Hits from this combat are used in the determination. Thessaly 4 has its Hits set to 6 and will not rout. RC AS VIIa is in a pickle. It is surrounded by enemy units and ZOC so is eliminated (clever positioning of Thessaly 2!). AS VIIc has but one route that is unobstructed so moves away from its retreat edge. The remaining routed RC is eliminated. None of the remaining combatants are in enemy ZOC, so no TQ checks.

On to the pursuit checks. Repeating same order, Thessaly 4 passes its pursuit check (DR 2) so Breaks-Off. The Roman player decides to change facing and does so incurring 1 Hit. The Guard does not check for pursuit since the eliminated RC was surrounded by enemy units/ZOC, so advances (SPQR 8.61). Thessaly 5 fails its pursuit check and must pursue so follows along the path of retreat and stops when it places the routed Roman RC in its ZOC. The Epirote player initiates Shock combat starting with a Pre-Shock TQ check for the routed unit (the attacker does not if the defending units routed). A DR of 4 eliminates the Roman RC. Thessaly 5 then must move its full MA since (the eliminated unit was a cavalry unit) in the direction the routed unit was headed. The move ended after 7 MP since Thessaly 5 had insufficient MP to move up slope. Thessaly 5 is then marked Pursuit/Finished. Thessaly 6 also fails its pursuit check so it must use 8 MP to head in the direction the routed RC was headed and then marked Pursuit/Finished. This concludes the Shock Combat segment. The diagram below shows the situation.

First Momentum Orders Phase – Movement and Missile Fire Segment
Pyrrhus’ first Orders Phase ends with four Roman units in the dead pile, a routed Roman and Epirote unit, a Rallied Epirote unit, and two others recovering from Pursuit. The Epirote player is not quite done and uses his leadership advantage to have Pyrrhus attempt Momentum, succeeding on a DR of 1. The Roman player would of course like to have a chance to stop this with a Trump, but Pyrrhus is the last leader to go, so no Roman leader is available. Even if this were not the case, the best Roman leader is a 5-Initiative rated one and is not up to the job. A 7-Initiative rated leader is needed here.
Pyrrhus will again use Individual Orders. He can’t rally the routed unit nor remove Hits (or do anything else) with the Rallied unit (SPQR 10.28). He can, however, remove Hits from the three HC marked Pursuit Finished. Thessaly 6 is in range so is ordered to do so. Pyrrhus needs to move to place Thessaly 5 in range, so Pyrrhus is first issues an order to himself to move then orders Thessaly 5 to remove two hits. Three orders used. Thessaly 4 can’t recover Hits and can’t do anything else. He has the Guard and Thessaly 2 available to attack the RC that is not fixed in a ZOC and chase down the routed RC. The Epirote player decides instead to be conservative and expends two orders to remove the Hits on Thessaly 2 and his Guard in case he fails his second Momentum attempt. He sees no need to move Pyrrhus again, so the Order Phase ends with no Shock combats.
Second Momentum Orders Phase – Movement and Missile Fire Segment
The Epirote player tries for his second Momentum and succeeds (80% chance). Since his Guard and Thessaly 2 are Hit free, he can afford the Hit to move them again to finish off the routed RC and attack the unentangled RC (AS XIXc). Pyrrhus’ first order moves the Guard, the second Thessaly 2. Drusus withdraws onto AS XIXc as the HC advances. With insufficient MP to get in AS XIXc’s rear, Thessaly 2 settles for flank, but as expected AS XIXc changes facing at a cost of 1 Hit (good die rolling Romans!). With the Rout Movement Phase coming up, the Epirote player repositions Pyrrhus to be able to rally Thessaly 1 next Game Turn and keep his other units in range.

Second Momentum Orders Phase – Shock Combat Segment
Now for the Shock combats, starting with the Guard. The routed RC passes its Pre-Shock TQ check! (Yes, it does happen). Since this is an isolated combat, I will go ahead and resolve it in its entirety. The combat will be resolved on Column 9 (no shifts, it was a moving attack). The Guard receives 2 Hits while the RC is eliminated. Not unexpectedly, the Guard fails its pursuit check and off it goes towards the Roman retreat edge. Note it will use 1 MP to change facing after entering the eliminated unit’s hex to point to the Roman retreat edge. It will stop before entering the river since it has insufficient MP to do so.
Now for the Pre-Shock Checks on the other combat. Nasty. Thessaly 2 incurs 2 Hits and the AS XIXc 1 Hit. Drusus is unscathed, so its Column 8 (the HC receives the Size shift) with a -1 DRM for Drusus’ Charisma. Another low roll results in a 3(2), enough to rout the Roman unit. Drusus goes along for the ride. Again, the Epirotes head off in pursuit. Drusus seeing the handwriting on the wall, withdraws when the Epirote HC stops adjacent rather than hang around for the combat. This time, the Romans weren’t so lucky with the RC failing its Pre-Shock TQ check. With the RC’s elimination, Thessaly 2 moves toward the Roman retreat edge. So ends Pyrrhus’ second and final Orders Phase, and the end of the Player Turns.

Game Turn 1 Rout and Reload Phase
The Game Turn finishes with the Rout and Reload Phase. Thessaly 1 changes its facing to point to the Epirote retreat edge and uses the remainder of its MA to move in that direction. Routed units do not incur a cohesion cost for terrain so is unaffected by the move up slope, though it does cots an extra MP. The Rallied and Pursuit markers are removed, and the leaders flipped to their “normal” side. The diagram below shows the situation at the end of the Game Turn.

Heraclea Opening Moves Closing Remarks
This extended example depicted a swirling and chaotic cavalry battle. Infantry engagements will be a bit tamer since there is no pursuit. On the plus side, most of the movement and combat rules received a chance to shine. The scenario rule provided for an opportunity to see a lot of action early in the game. While the discussion focused on the cavalry battle, the other segments of the armies were motion but at snail’s pace in comparison with what unfolded in the above account.
Was the loss of his entire right wing cavalry force (the lone first turn survivor won’t last the second) at a cost of 35 RP worth it? All (most likely) of the Epirote units will survive, though two are in a Depleted state. The cost is 0 RP. But then look at the scattered wing. It will take Pyrrhus two or three Game Turns (maybe less if Megacles lends a hand) to reconstitute this wing into an effective fighting force. In that time the Elephants are leaderless, and the Romans have ample time to assault the Epirote left wing per the Battle Plan and prepare a defense on the Roman right to address the Epirote cavalry assault that will eventually come.
Playing a few more turns may well tell the tale …
Acknowledgements
I would like to thank Fabio Bernardini, Stephen Welch, Dan Fournie, and Brendan Clark who kindly reviewed and provided feedback on this article.
Previous Articles:
SPQR: A Guide to Playing the Game — Part 1
SPQR: A Guide to Playing the Game — Part 2

Author: Alan J. Ray

Thank you for these articles, but they are unusable for me because for some reason they cannot be printed–every time I have tried to print any of these three articles, I get a message that “images are still being loaded”, and the articles don’t print. I don’t read stuff like this on my computer, so at this point I can’t read them.
I tried using the print icon three times. The first time no problem and I saved to a PDF. Second time I received the message you received so cancelled and tried again per the in the dialogue box. On the next attempt (immediately after) printed fine. I suggest trying again.
Thanks, but I’ve tried a couple of dozen times with the same result every time. Which browser did you use? I use Chrome
Chrome
I also tried Firefox. Different dialogue box and worked every time. Faster than Chrome