
Introduction by Assistant Designer & Editor, Fred Schachter: With apologies for the break in the action since this series’ Part One: Humans Versus the French Bot: An After-Action Report of a Prospective Official Variation for Playing Congress of Vienna (Part 1 of 4) – InsideGMT for there are times, as so many InsideGMT readers know all too well, that life occasionally intercedes to disturb the planned enjoyment of our beloved hobby of gaming.
Such was the case with this series’ Congress of Vienna game. But we did resume play of this prospective variant versus the French Bot. Should readers need a refresher, here’s a recapitulation of why this variant was tried: for an aspect of the published game was the group’s consensus that human players facing the French Bot had a distinct advantage, particularly during the late game and specifically with the 1814 “Desperate Times” Scenario such that France was doomed to lose. Where’s the challenge in that?!? Therefore, the following prospective CoV Playbook change was agreed to as meriting testing. Would the French Bot now be more competitive and have a better chance in achieving a Congress of Vienna game victory? Here’s the modification…

Consequently, this article is a continuation of Justin’s After-Action Report of an underway game he is participating in against the French Bot. This is a report of its second turn (CoV Turn 9, Jan.- Feb. 1814). Justin played Austria, Designer Frank Esparrago Russia, and CoV Team stalwart, David Schoellhamer took the role of Britain. If needed, this 1814 “Desperate Times” game will have a fourth Optional 11th Turn (see Cov Rulebook Section 15.4 Sudden Death Time Limit).
So, here’s Justin’s latest Report of what’s proving to be a fun, exciting, and most interesting game of Congress of Vienna!
In preface to the following after action report, I must take a moment to explain how this and our other CoV play testing sessions differ from the rules as written regarding Congress of Vienna’s French Bot.
When playing against the French Bot, the standard procedure is for one or two human players to face off against their “systemic” opponent while utilizing a modified card-play rule that is very different from that used when playing against a human French player.
I quote from the Congress of Vienna Living Playbook:
“Solitaire games can be played as a human French player against the three Allied Powers played by their Bot [20.0], a human Coalition player (all three Allied Powers) against the French Bot [21.0], a human Allied Power player against the French Bot and other two Allied Powers using the Allied Bot [22.0], and non-competitively without a Bot [23.0].”
For this article series, we played using none of the above options. Instead, we three human players played the game with full card hands, contrary to the CDGSM, with only the French bot playing with the card limitation of that method.
This is a significant difference, given that this was not how the published game was designed to be played against its programmed Bot. In my opinion, our testing has shown the design of the Bot is sufficiently robust to capably handle itself using this currently unofficial play option from this “Desperate Times” game’s Turn 1, Nov.-Dec. 1813. I invite others to follow suit and experience for yourselves how the French Bot can defend itself against a coordinated human effort.
others to follow suit and experience for yourselves how the French Bot can defend itself against a coordinated human effort.
Now, back to our replay narrative…
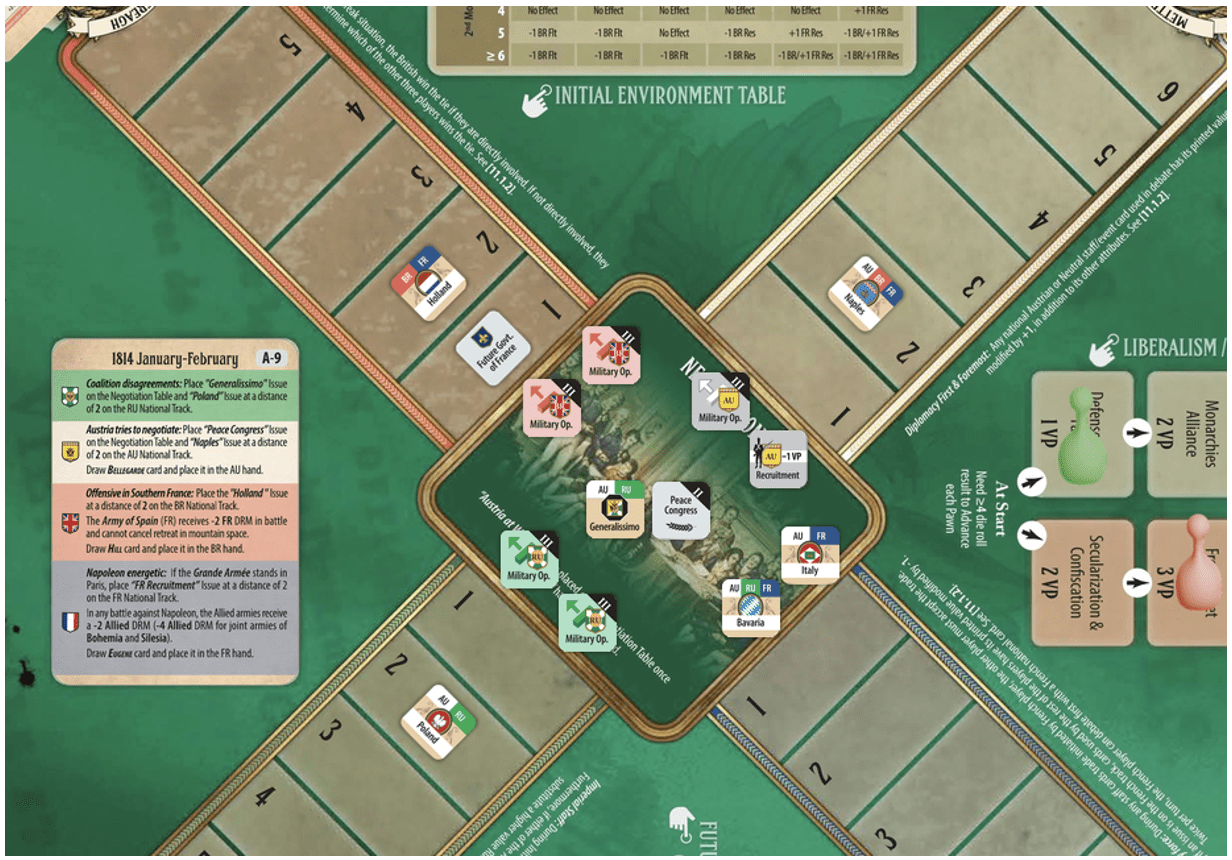
Turn 2, Jan. – Feb. 1814, began by performing our sole suggested rule change for this method of play, placing the French RecruitmentIssue on the French Seat.
Since Britain won the Wager by one, he selected Future Government of France and placed it on the British Track’s one position.
As Austria, I selected AU Recruitment and an AU Military Operation as my two Issues. The French Bot, per its instructions, chose the Minor Country Issues of Italy and Bavaria (since, if won, each would generate a VP and a unit). Russia placed both of its Military Operations on the Negotiation Table and then Britain ended the Issue Selection Phase by also placing both of his Military Ops. See Figure 1 above for all Issues’ placements.
We three Allies enjoyed planning for the upcoming War Phase using our combined might. The intent was to victoriously advance on all fronts, squeezing the paper Napoleon as best we were able with coordinated attacks. (Spoiler alert, we did not, in fact, squeeze France all that hard: but do read on).
Early during in the Diplomacy Phase, Russia attempted to trade with Britain, but were shocked to learn, to everyone’s misfortune, that Britain did not have any Russian Cards. Thus, Wellington was deployed on the political front by Russia, using his massive value of 5 for debating a French negotiation of the Poland Issue, moving this counter to the Russian Track’s 2 space. Oh, how Wellington would be sorely missed for Britain’s planned Spain offensive!
Russia then attempted to gain the Generalissimo Issue, which the French Bot promptly denied by adroitly playing the Barclay de Tolly card to move the Issue back to the Negotiation Table. This was only possible due to the Bot using one of the two French Debate Pre-Empts.
During Austria’s Round 5, I secured Peace Congress, but France immediately went after Generalissimo as winning that issue would cause the Coalition some serious problems on Track A. Namely, the two Allied Track A armies, the RU Army of Silesia and AU Army of Bohemia, would be at a severe disadvantage in their goal of retaking Bavaria. Luckily, Russia had an interest in maintaining control of the Generalissimo and debated that Issue back to the center of the table.
I then played a card to fulfill Austria’s Generalissimo ambitions by moving it to my Track.
At the end of Negotiations, with some fortunate cards from the initial draw, Austria was able to win the Diplomacy Phase with six (6!) Issues and secure the Generalissimo Issue for myself. Alas, I lacked the financial resources to pay for everything. Austria receiving but three Resources each turn is a frustrating situation. Russia would remain Generalissimo.
As it stood, Austria was only capable of paying for two of its hard-won Issues Peace Congress and the AU Military Operation, deciding to save its final Resource to acquire an all-important Military Support marker (for its +3 Battle DRM).

Sadly, the VP award each turn for Generalissimohad to bow to the higher priority VP penalty of the Peace Congress inflicted upon France and the award and penalty for Austria: winning both the Issue (using Metternich) and as the winner of the Diplomacy Phase. These dice roll results were a wash at 1 and 1, respectively. France lost 2 VP but was still ascendent with 54VP.
The Diplomacy Phase ended with Britain having 48VP, Russia 36VP. and my poor Austria at 32VP. Yet, we three human players knew we had a good chance at driving France’s VP down with the upcoming War Phase’s attacks on Tracks A, B, D, F, and G (The War of 1812 Box). Oh the anticipation!

One of the greatest aspects of Congress of Vienna is the sheer re-playability of the game through its random initial card draw each turn. Unfortunately, Russia had no military cards to speak of this turn and so the Allied cards for Front A’s battle were limited to those of Schwarzenberg and Reuss-Plauen. Yes, Russia was Generalissimo, but the only two available Military Cards were Austria’s! I was doing my part! At least the former receives an additional +2 DRM on Front A if Blücher and/or Barclay are not used (which was the case).
The Initial Track A Battle Difference, with 6 French vs. 13 Allied units, was great enough that the French Bot chose to withdraw, causing their losses to be three instead of four, where the Coalition lost two units.
The Grande Armée was reduced from six to three units and Bavaria returned to Coalition Control. Had this battle taken place in Paris, this devastation of the Grande Armée down to three units would have precipitated Napoleon’s surrender (abdication) and the end of the game. But at this point France would fight on.

The Russian attack on Front B came as a slight surprise, since Russia had chosen to hold back its Military Cards from Front A. As the Initial Battle Difference (IBD) was not enough to cause the French to Withdraw, the Bot made the better call to fight it out. I mention this as a loss would cause the Grande Armée to abandon Alsace and automatically withdraw into Paris, as the French Army of Elbe would retreat from Belgium into that same location.
However, Russia had held two battle cards (#63 and #65) adding a combined +6 DRM, where France had no Military Card[s] to play, apart from a fog-of-war card. But that “fog-of-war” card was revealed to be Britain’s Baron Bexley, which was of no help to either side.
Russia rolled a 5, causing two French casualties. Ah the suspense! France needed only a 6 or more on the dice roll to gain a draw and retain Belgium, but as luck would have it, their result was also a 5. Thus, the Allied players avoided a near-disastrous loss, as they were quickly running out of time to reach Paris and hopefully force a French game defeat.
Therefore, the French Army of Elbe retreated from Belgium into Paris, its piece removed from the board, and its single surviving unit absorbed by the Grande Armée, now compelled to defend Paris at a dreadfully small strength of but four units.
This game’s human players gave a sigh of relief and a Turn 3 battle for Paris was on!
The French Bot, of course, could not react… but we used our imaginations visualizing a furious Napoleon gnashing his teeth, grumbling fierce Gallic curses, and perhaps jumping up and down in frustration. Ah the excitement we shared upon seeing such a weak Grande Armée in Paris!

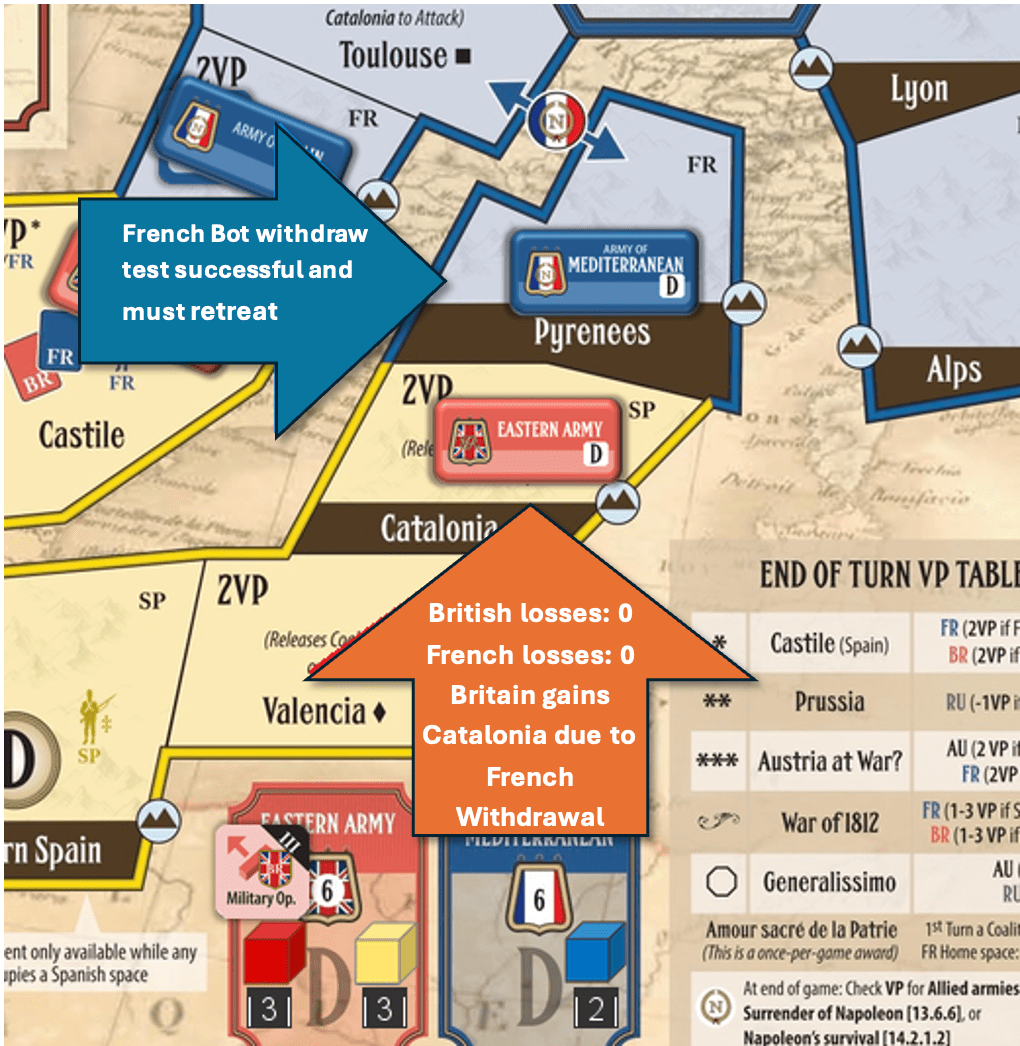
The War Phase action then went to Spain, where a British attack on Front D was of sufficient strength that the French Bot had to test for a preventive Withdrawal die-roll, which occurred! This twist of die rolling fate would compel France’s 2-unit Army of Mediterranean to abandon Catalonia to the 6-unit (3 BR & 3SP) British Eastern Army, thereby abandoning the last vestige of French power in occupied Spain.
French play of Suchet prevented the Eastern Army, led by Morillo, Castaños, and Rowland Hill, from inflicting any loss upon it. Nor did Britain lose a unit. Had a field battle taken place, this “theoretical draw” would have allowed France to retain Catalonia, but as the unfortunately successful test for a withdrawal of the Bot happened, the French Army of Mediterranean retreated into the Mountain fastness of Track D’s Pyrenees.
I state “unfortunately” as here is where we players all agreed that a typical human French opponent would have likely fought the battle, in the expectation of holding on to Catalonia. Now, this was our collective opinion at the time, but again the Bot successfully carried out a Withdrawal and was able to retreat its undamaged army back into France.
As a result, Catalonia changed hands: France lost 2VP while Britain gained 2VP. Another blow to the Corsican Ogre had been struck! Spain was liberated! As this turn saw the Future Government of France Issue removing Napoleon as Emperor, Britain could potentially, with the next turn, advance on the Pax Britannica Track for 3VP with the “Spain Liberated” prerequisite being fulfilled.
Future Government of France Issue removing Napoleon as Emperor, Britain could potentially, with the next turn, advance on the Pax Britannica Track for 3VP with the “Spain Liberated” prerequisite being fulfilled.
And now, to the most important battle of the turn (ahem): the Italian Front F, where Austria (me) worked to create yet another dire threat for the French Bot to contend with.
As Austria lacked the Resources to pay for more than half the Issues I had won during the Diplomacy Phase, I chose to save a Resource for a Military Support and added it to Front F.
However, the Bot’s placement of several of its new recruits into that Front caused the French Army of Italy to have 6-units versus my Army of Tyrol’s 6 units resulting in a +3 IBD for France. This meant there’d be no test for Withdrawal from Venice; a prize worth 2VP to me. Both antagonists’ armies were at full strength and a fight it would be!
Having judiciously saved three relatively powerful (at least for Austria) Military Cards: Von Klenau, Gyulay, and Bellegarde, there was high confidence of glorious victory. However, France played the loathsome Eugene, offsetting the -5 DRM applied to the French and resulting in a meagre cumulative +1 from those Austrian Military cards.

The “fog-of-war” card was Sherbrooke, so at least it was not a further insult to the Austrian injury. In case readers question, with the Bot, French “fog-of-war” Military Cards can be held for an applicable upcoming battle that same turn. This bonus is denied to human Allies. Therefore, the Sherbrooke Military Card, which could provide Britain a +3 or -3 to France’s DRM for the upcoming War of 1812 Box battle, had to be discarded.
The miserable dice rolls of France (3) and Austria (5) were such that the battle result was a draw; Austria needed at least a 9 for a clear victory (the French Bot denied me again!). One of the things I groused about was how the French Bot, with automatic award of the French Recruitment Issue per this variant, placed new units into the Army of Italy, to confound me, when a Human French Player could well have chosen to gut his Track F Army and abandon Venice to Austria, in order to better defend elsewhere… particularly Track B’s Army of Elbe in Belgium. This behavior by the Bot resulted in gains for our Coalition Team… although Austria wound up being the turn’s “tail end Charlie” VP wise.
Again, we players agreed we each would have made a choice different from that of the Bot. However, the next part of this series will show that perhaps the Bot “knows” what it’s about.
Our final battle on Front G (War of 1812 Box) ended the turn quite appropriately, when France, representing the U.S.A. and Britain battled to a bloody draw. France rolled an 8, and Britain, needing a dice roll of 9 or more for a clear victory, rolled a 7. For Sherbrooke’s presence here would have made a significant difference, as the use of his bonus, either a positive or negative DRM, would have given Britain a win on this Front.

With these results, the turn’s Military Phase was over.
Oh, the calamity! What started out with such auspicious portents and to what end?
While Allied victories on Fronts A, B and D were clearly damaging to France, in this three-turn 1814 “Desperate Times” Scenario, we players could not assume that would be enough. Austria’s continued failure on Front F and Britain being unable to secure America for the possibility of a war ending Treaty of Ghent caused us no small amount of consternation as we contemplated Turn 3.

Britain was now clearly in the Victory Point lead, but we still had to defeat Napoleon and that left determing the resulting game winner clearly open to nearly anyone, except Austria (poor me!). Failing to take Italy before Naples fell to Britain and gaining no ground at all on Front F meant Austria would have to struggle to garner as many VPs as possible over the next turn.
With the end of Turn 2, Napoleon was out of power, but was he really? Britain was well-positioned, with Russia within striking distance, but France need only to regain enough VPs to make it all moot.

At this point, before signing off from this Vassal session, we discussed the strength of the French Bot in facing threats on almost every Front, as well as its lack of Military Cards (although those cards it played or gained through “fog-of-war” were significant to their battles’ outcomes).
We were also unsure of whether we could force a French loss as the odds certainly did not seem to be in our favor.
As it turned out (pun intended) Turn 3 was highly illuminating and that’s the next piece of this series. Please join to resume with us the fun, suspense, and excitement that Congress of Vienna GMT Games – Congress of Vienna, 2nd Printing can provide.
Previous Article: Humans Versus the French Bot: An After-Action Report of a Prospective Official Variation for Playing Congress of Vienna (Part 1 of 4)

Author: Justin Penwith
