

Welcome back to our playthrough of the first voyage in Zheng He: Admiral of the Ming Fleet. This is part 3 of 4 and will make a lot more sense if you read parts 1 and 2 first.
We have played through the first five turns of the 22-turn voyage. I’m going into a lot of detail about the rules and my thought process, but during actual play, once you know the rules, each voyage takes about 30-45 minutes to complete.
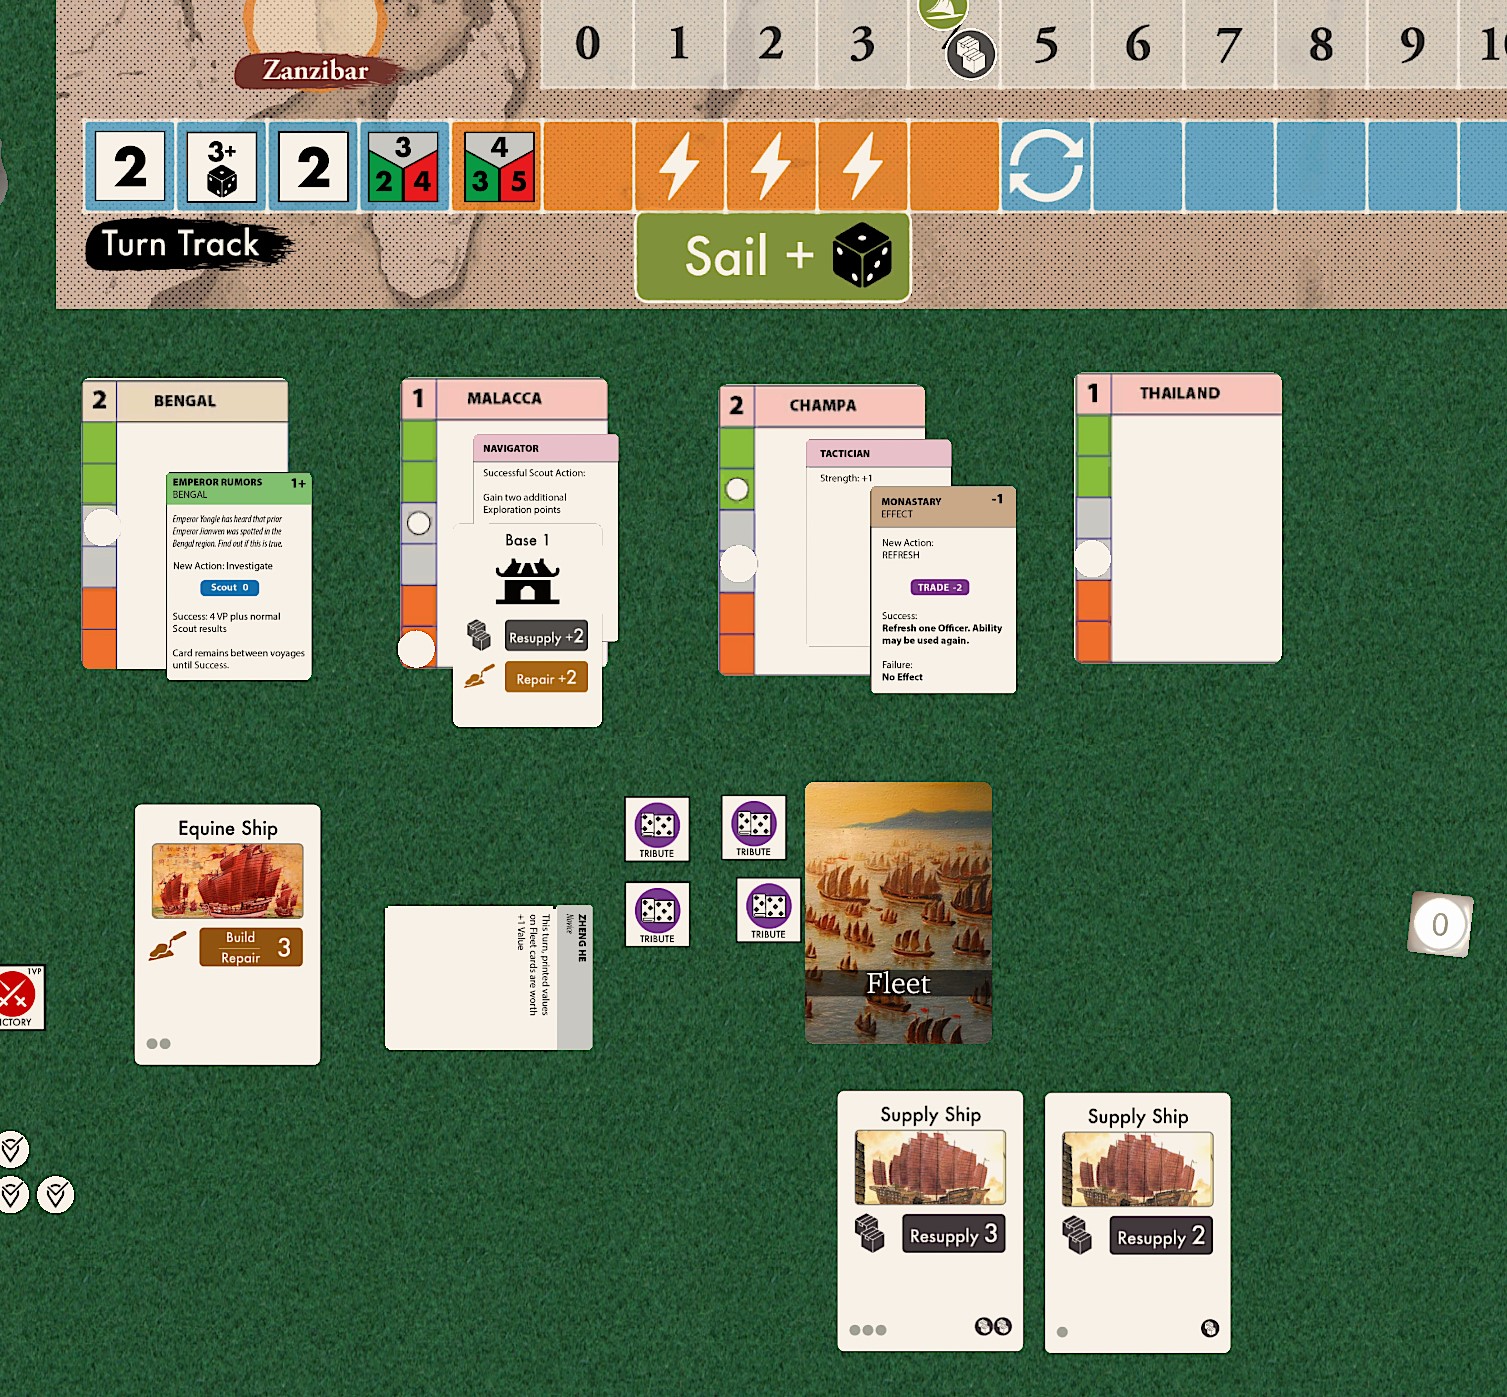
We are located in Malacca and are running very low on cards in hand, so we will need to Resupply as our first order of business.
Turn 6:
Tianfei: 1+DR
I’m going to take a two Action turn. I could probably get by with just using my Resupply 3 card, but I’ll have to roll two dice (one from Tianfei and one from the double-action), so let’s use both the 3 and the 2.
DRs: 0, 1+, then the reroll on the 1+ was a 0 (yay!) – so net +1. I could’ve just used the 3!
Draw six cards (4 Resupply, plus 2 for the base).

Second Action: I’ll Scout to take advantage of the leader who is a Navigator.
Scout 3: DR/DR: 0/0. Success, so I get 6 Exploration points to spend – 4 for the Patrol Ships in my deck, and 2 for the Leader in Malacca.
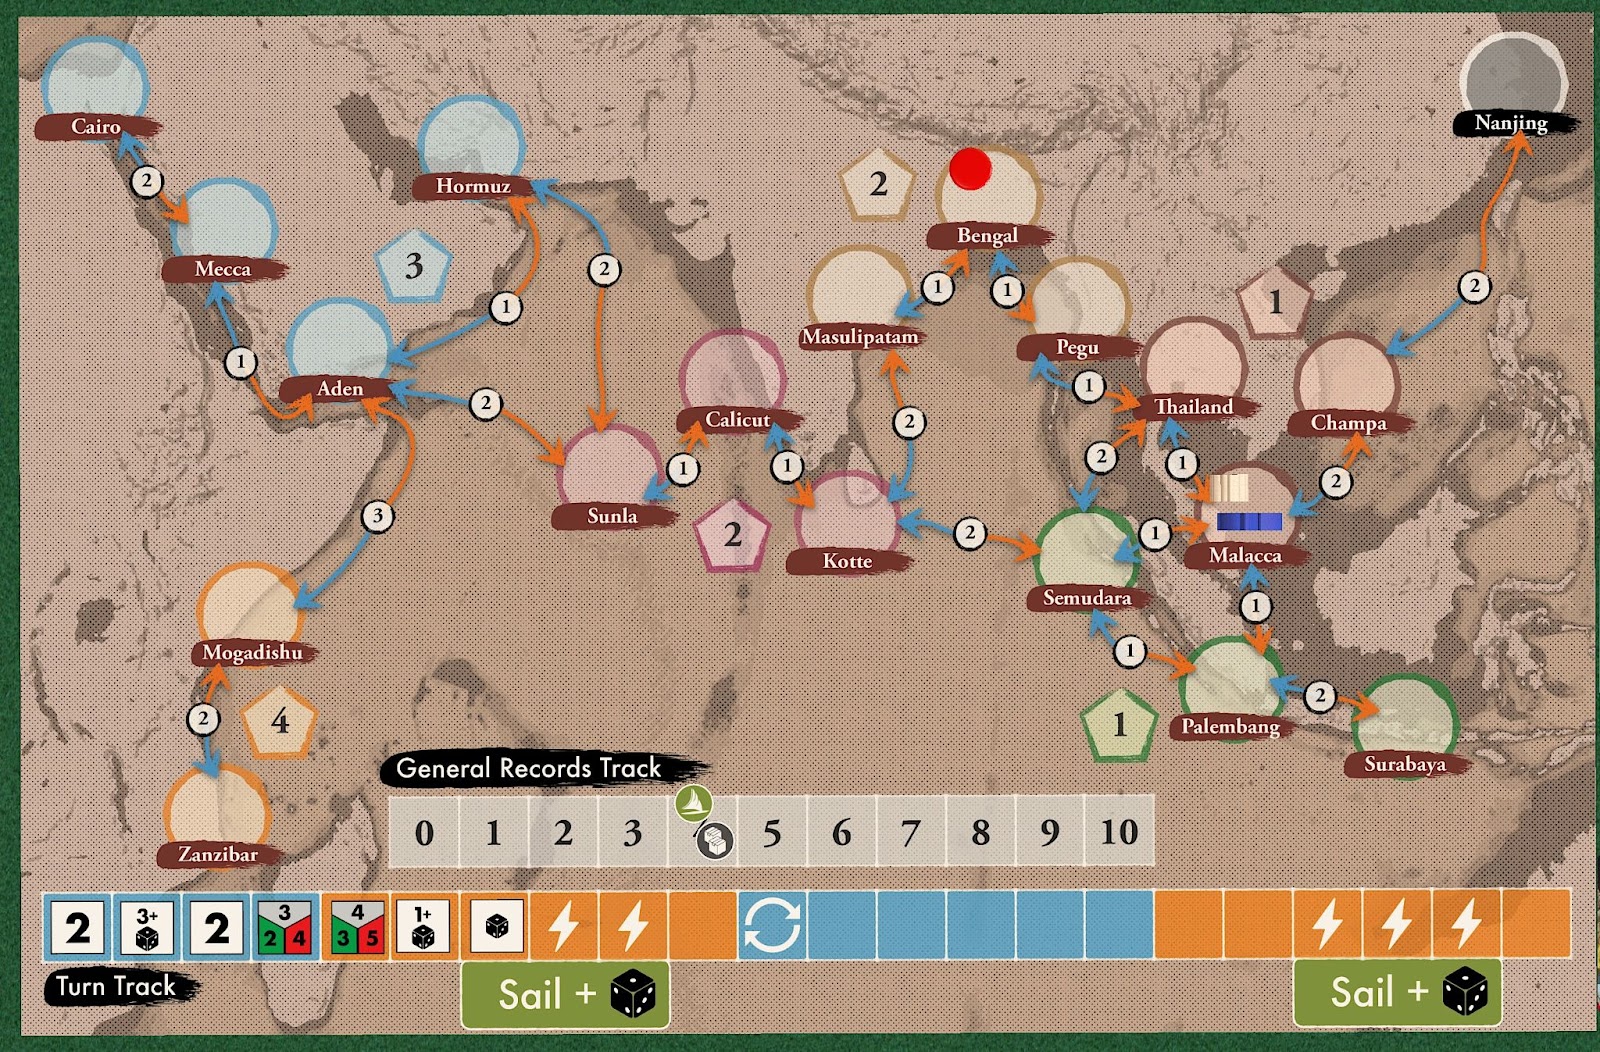
My goal is in Bengal, so I could Scout all the way to there (Thailand, Pegu, Bengal). Instead, I’m going to scout Palembang, Semudara, Thailand (1 each), and Kotte (2). I’ll waste the last point.

My thinking is: the next three turns are orange storms, so I’m not going to be sailing in the blue direction (westward). Just too risky with the summer monsoons and winds blowing the wrong way. So I may go to Palembang, just to get the Victory points for visiting. Then during the blue turns I sail to Kotte (located in modern-day Sri Lanka) and start to work my way back home via the coastal route through Bengal. But let’s start by looking at the adjacent ports.
Palembang: Efficient Leader, Rare Godos
Semudara: Suspicious Leader, Plenty
Thailand: Suggestible Leader, Expansionist Neighbors
Palembang and Semudara are both located on the island of Sumatra, in modern-day Indonesia.

Hmm… after seeing these, I’m thinking that Palembang looks like a good place to visit. They are close to green, and I can Trade and get a good Resupply there. Thailand also looks similar – so maybe I should stay close to this area.
The Trade Action allows you to exchange Tribute tokens for Goods tokens (which are worth 1 Minister Point each at the end of the Voyage). The Rare Goods Event allows you to exchange up to three Tribute for an equal number of Goods. This is advantageous because normally a Trade Action only allows you to exchange one Tribute token.
With my final 3 scout points I scout Bengal, skipping over Pegu.
Bengal: Needy leader, Shipyard
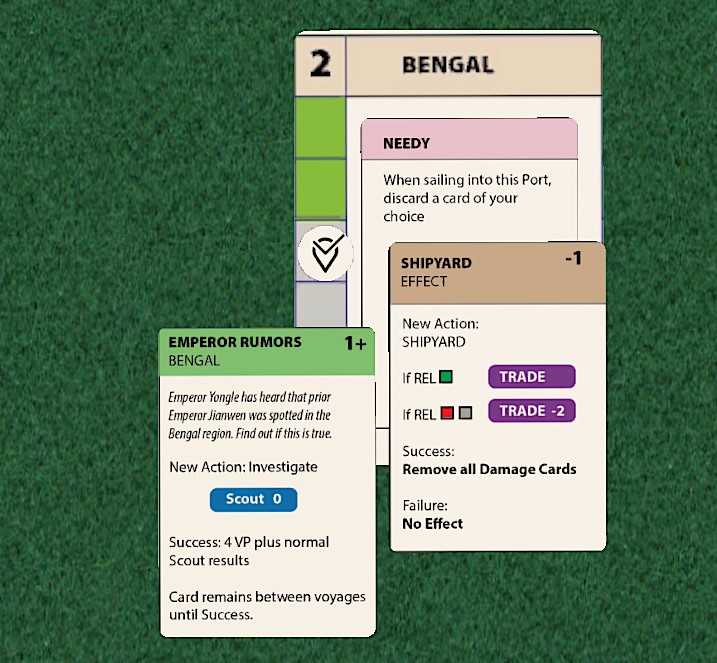
Needy leader isn’t that great (I have to discard a card when I arrive there), but Shipyard is great. I don’t have to worry so much about taking damage to get there.
End of turn: Draw Patrol Ship
Turn 7:
Tainfei: DR
One of the best Tianfei draws. I’m going to take a two-action turn and sail to Palembang. The difficulty will be 1+three dice – one for the Tianfei, one for double action, and one for the storm. I decide to use both my Sail 2 cards, so 4 total.
During the summer Monsoon season (orange spaces on the turn track) there are a few turns marked with a Storm symbol. If you do a Sail action during those turns, you must roll an additional die.
Total on 3 dice is a +3 – got a little scary there – so total of 4. I arrive at Palembang through the storm with no damage.
Second action: Negotiate. I want to get them into green to make the Rare Trade Goods action easier.
I play a Negotiate 2. Difficulty is 2 dice. I roll a 0/0, so success. I move the relations to green. I could also spend a Tribute token to move it to max in green, but I’m going to just take the one box shift.
A successful Negotiate Action moves the Relations marker up one box. On a success you can also spend any number of Tribute tokens (you start with four) to move additional boxes.
Draw: Patrol Ship
Turn 8:
Tianfei: 3
I will just do the Rare Goods trade. It’s at trade -1, and I have 2 Trade-2 cards, so auto success. I trade my final three Tribute tokens for 3 Trade Goods.
Each Trade Good token is worth 1 Minister Point at the end of the voyage, which are spent to upgrade your fleet deck and officers.
Turn 9:
Tianfei: 2/3/4 (so 2 since Palembang is green)
Last storm turn. I’m just going to do a single action and Resupply. It’s automatic with my Resupply 3. I draw 5 cards (my normal Resupply rating of 4, plus 1 extra for the Efficient leader of Palembang – thanks!).
Plus I still draw my end-of-turn card, so I have 9 cards (max hand size is 10). Things are looking good for us to head up to Bengal!
Turn 10:
Tianfei: 1/2/3 (so 1)
Omens are good! This trip to Palembang has been really productive. I’m going to try a double action turn.
Action 1: In honor of their support for the Emperor, I’m going to try to get an Envoy from Palembang. This is a regular Negotiate, but if I exceed the target by 2, I get an envoy which is worth 1 VP (the region value, which is 1 for Indonesia).
I’ll use two Treasure Ship cards for 4 Negotiate. I roll a 2+ (oh geez), followed by a zero on the explosion roll. Total is 3, so with 4 Negotiate I succeed in raising the Relations but not enough to get an Envoy.
Action 2: Sail all the way to Bengal in one shot. Distance is 4, which is the max I can go. I’m also against the wind, so it is 5+DR. I will spend three Sail 2 cards, for a total of 6. DR is 0, so no damage.
When I arrive I have to discard a card, due to the Leader effect. I discard a Resupply 2.
Draw: Resupply 3
Turn 11:
Tianfei: 4
When I put the Tianfei marker in this square, I return all the old ones to the pool (indicated by the Arrow symbol on the map).
A ‘4’ is not great, so I’m just going to finish the goal and check out the Rumors that the deposed Emperor is taking refuge here. I have four Scout, so I automatically succeed. That gives me 4 more VP.
Draw a Negotiate/Trade 2.
This completes the first half of the voyage (in terms of turns), so let’s take stock of where we are.
I’ve got 14 VP – 5 for visits (Champa, Malacca, Palembang, Bengal), plus 4 for the first-time visit bonus for each of those. We got 1 VP for the successful Depose action in Malacca, and 4 for completing the goal. If I end with fewer than 15 points I am Admonished, and since I don’t have a Gratitude yet (for scoring 25+ on a prior voyage), that would end the game for me. But I’m confident I’ll at least be able to get to 15, and if I visit just two more ‘2’ region ports (worth three each), I’ll reach 20 and avoid Disapproval. So I’m in OK shape on VP.
On the MP side, things are not great – I’ve got 3 for trade goods, plus 1 for Palembang relations. I’ll need at least 2 at the end of this voyage to be able to continue to the next, so that’s not in jeopardy. But any excess Minister Points I earn are used to upgrade the fleet. I need to increase that to put me on a firmer footing for the future.
So I need to get more Ports into green relations. Bengal and Thailand are only one box from green. But I should probably scout to see what else is going on and if there are possible targets for increasing relations, or even for Deposing, which jumps relations up to max (of course the new Encounter card draw may lower that).
Will I succeed in placating the Ministers back home? Stay tuned for the 4th and final playthrough article to find out!
Previous Articles:
Zheng He Playthrough with Geoffrey Engelstein Part 1
Zheng He Playthrough with Geoffrey Engelstein Part 2


