

Here we look at seven more scenarios appearing in Wing Leader: Eagles and examine some of their design features, rationales and special rules.
Scenario E08: Bad Landfall
 Setting: Coastal Command campaign, Norway, 7 December 1944
Featured Aircraft: (German) Bf 109G, Fw 190A-8; (British) Beaufighter Mk.XIC, Mosquito FB Mk.VI; Mosquito FB Mk.VIII ‘Tsetse’, Mustang III
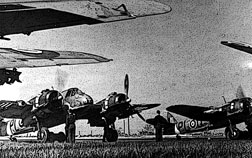
RAF Coastal Command’s campaign against shipping along the European coast is an historical footnote. However, the battle was prone to moments of great drama. Bad Landfall captures just such a moment, where poor decision-making resulted in a strike wing of Beaufighters and Mosquitos making landfall near a Luftwaffe fighter base. Bad timing allowed Jagdgeschwader 5 to pile in, creating a low-level donnybrook over the coastline.
Of interest here is the matchup of modern fighters against bombers, that could, in a pinch, look after themselves. However, the Germans lack numbers and are pretty much required to divide their strength if they want to tackle enough of the opposition. Thanks to a special rule, simply attacking the bombers will, as in history, cause them to jettison their munitions and run. The bombers have a tiny escort of Polish Mustangs, equipped with all the toys (an Experte and gyro sights). However, this is really a scenario about running away. ‘Escape’ scenarios can be hard to get right; as a designer you want encourage a battle, not an exercise in hide-and-seek.
Given that this is a low-level bombing scenario, I have employed a feature that’s become increasingly important in my designer’s palette: that of capping the VPs that can be earned from a single target. In this case it seemed appropriate, given that historically the bombers didn’t hang around, to limit the British to x1 of the airfield’s VP value. Once the British have hit the VP cap for rocketing the airstrip, it’s time to bug out.
Scenario E09: Operation Rädda Danmark
 Setting: Counterfactual Swedish invasion of Denmark, 18 May 1945
Featured aircraft: (German) Bf 109G, Bf 109K, Fw 190A-8, Fw 190D; (Swedish) J 22, B17B, B18A
So yes, we have a counterfactual with the express and admittedly eccentric intent of introducing the Swedish Air Force to the game.
I regard counterfactuals with caution. I prefer my ‘what ifs’ to cleave closely to history and not spin off into wacky fantasy. This is why this scenario (the title translates as ‘Operation Save Denmark’) is based on a narrowly-avoided event. Historically, a plan was put in motion to liberate Denmark before the Soviets could take it. Swedish units were put in position and D-Day was set. However, Germany surrendered before the operation was launched, so for this scenario we assume that Germany hangs on for a couple more weeks.
The only other tweak of history we have here is in the form of light interference from the Luftwaffe, mostly in flight strength. In reality, a lack of fuel would have prevented more than a token response. For the sake of making the game a contest, I simply added in a few more tokens. The result is an interesting matchup of superior German equipment against Swedish pluck; an asymmetry that’s rare in a late war scenario.
Another interesting feature is the first appearance of the Swedish dive-bombing sight, sometimes known as the ‘Wilkensson sight’ after its inventor. This sight is being introduced with the second edition of Wing Leader, and it permitted accurate bombing from shallower dive angles than before. With it, fighter-bombers could achieve dive-bomber levels of accuracy. The Swedish sight became standard after the war, the Americans fitting them on their Korean-era jets. Here, they are being used by SAAB B 17 and B 18 light bombers, to deadly effect.
Scenario E10: Rocket Men
 Setting: Reich air defence, 2 November 1944
Featured Aircraft: (American) B-17G, P-51D; (German) Bf 109K, Fw 190A, Fw 190D, Me 163, Me 262
I find that gamer interest in the Western European air war tends to drop off after the summer of 1944, and that people only perk up at the mention of jets and rockets. Rocket Men has both, and at last we get to see the Me 163s in action.
This is a troublesome scenario for two reasons. Firstly, properly handled jets and rocket planes make for dull, dull scenarios. When they appear, they often blow on through the bomber formation, and bug out after harvesting the odd kill. Attempts to create ‘pure’ jet and rocket scenarios are really no fun. They rarely last more than a couple of turns and are frustrating for both sides. In our experience, you have to add some piston-engined action to the German order of battle, and make the zoom-zoom jets a sideshow. That immediately limits the number of historical engagements you can use as the basis of a scenario, and there are few such events in 1945 that have much entertainment value.
The second troublesome problem is in getting the behaviour of the Me 163 right. The rules for this aircraft have gone through multiple iterations since the first edition and we want to perfect them for the second edition rules. Even as I write, we are still validating the rules set against history.
Scenario E11: Things to Come
 Setting: Japanese defence of the Home Islands, 7 April 1945
Featured Aircraft: (Japanese) Ki-61-I Hien, Ki-44 Shoki, Ki-45 Toryu; (American) B-29, P-51D
This was one of those scenarios that jumped out at me when trawling my library of history books for ideas. Things to Come depicts XXI Bomber Command’s medium-level raids on Tokyo and Nagoya. Given the massed response the bombers received by raiding at a lower altitude, it was a great candidate for a scenario featuring many interesting late war interceptors. Here, the order of battle includes the Ki-44-II (which comes in regular flavour and the interesting bomber-killer version with the Ho-301 40mm cannon), as well as the Ki-45 twin-engined fighter, and the Ki-45 KAIb big gun bomber-killer.
An early issue we had with this was in incentivising interceptors to go for the powerful bombers, instead of racking up scores on the fighters. We reported a similar problem with Scenario E02: The Last Samurai. A similar technique of rewarding the player for simply attacking bombers provided the impetus we need.
Another feature of this piece of history is the knowledge that some Japanese tried Taran-style ramming attacks on the B-29s. To fit this in we chose to borrow the Taran rules from the Wing Leader: Blitz campaign game and apply it as a special rule.
Scenario E12: Meridian Counterattack
 Setting: British Pacific Fleet at Sumatra, 29 January 1945
Featured Aircraft: (British) Seafire LF Mk.III, Hellcat F Mk.II, Corsair Mk.II; (Japanese) Ki-48
Wing Leader lends itself well to solitaire play, and a lot of gamers (and some testers) prefer playing it this way. Kamikaze scenarios are often not much fun for the raid player, so it’s good to use these as vehicles for solo scenarios, in which the Kamikazes simply trundle toward their targets and attack. This scenario features a suicide attack against the British armoured deck carriers, and was a nice opportunity to create counters for fighters in British naval schemes. The result is an interesting little palette-cleanser of a scenario. A major change we implemented in testing was to remove the defender’s GCI, which makes things a little more tense than if the defenders had perfect control.
Scenario E13: Desperate Improvisation
 Setting: Japanese Home Islands, 16 July 1945
Featured Aircraft: (American) P-51D; (Japanese) Ki-100-I
The Ki-100 is one of those ‘lost’ fighters of the war. It’s so obscure that it didn’t even acquire an Allied codename. However, it’s a pretty thing, a radial-engined fighter that came into being as an improvisation, when the factory producing motors for the Ki-61 was bombed, leaving a production line of airframes without powerplants. The new interceptor was, by all accounts, a nimble low-altitude performer that could hold its own against the Americans.
This simple scenario pits Ki-100s against a force of strafing P-51Ds. The difficulty with the first draft of the scenario was that although the interceptors started almost on top of the P-51s, the ground attack part could be finished before they could meaningfully stop the attacks. To get to grips with this, we wanted to limit the bombing profiles the P-51s could use, and so we chose to restrict the weapons loads to bombs only. This pretty much forces the Mustangs to employ steep dive attacks if they want to quickly rid themselves of their bomb loads. At the time of writing we are still adjusting the start configuration to give both sides some interesting opening choices.
Another thing we tried with the first draft was to create a victory scoring system based on the exchange rate. However, this turned out to be complex, and created a perverse incentive that encouraged the Japanese to run away if they achieved minimal successes early in the game. We eventually went back to the more conventional VP-based victory conditions.
Scenario E14: Butcher’s Bill
 Setting: Battle of Leyte Gulf, 24 October 1944
Featured Aircraft: (Japanese) B6N2 Tenzan, D4Y Suisei, A6M5 Zero; (American) FM-2 Wildcat, F6F-5
This is an unashamed paean to Grumman’s Wildcat, which featured in Wing Leader: Victories, but here gets to make an appearance in its late-war incarnation, as an escort and ground-support fighter. Towards the end of the war it became a second-line fighter-bomber, launching from ‘Jeep’ carriers to do the everyday dirty work that the big-deck carriers were too busy to do. This incident is taken from the Battle of the Sibuyan Sea, part of the great drama of Leyte Gulf, in which a scratch force of interceptors tried to hold off land-based raiders headed towards Task group 38.3.
Here is a simple set-up, with an asymmetry of forces. One special rule adopted for this scenario was for broken bomber squadrons to return to base. This has little effect on this scenario other than to add a nice historical touch and give the American player the feeling of turning back the tide. The primary interest of Butcher’s Bill is in matching up late war versions of early war foes, with the FM-2 Wildcat, little faster than its early war incarnation, tackling the more powerful late war Zero. For once, the USN doesn’t hold an advantage. They are also deployed as flights, which are brittle and prone to break. So we help the Navy flights through the initial engagements by giving them a cohesion bonus to their first air combat.
Weather also plays a part in this scenario. There is a lot of cloud and even rain, and though it’s not a bombing scenario we allow the bombers the choice of changing altitude. They can drop into cloud to avoid combat, but when attacked there face large penalties to cohesion, so it’s a double-edged sword. The Japanese have some interesting decisions as to when, or if, they will try and use the cloud. The result is a highly volatile scenario that can easily swing either way.
In the final part of this article we’ll look at the remaining eight scenarios, including the introduction of the Hungarians, a look at the Kuban fighting (at last!) and a lot of action for the British Fleet Air Arm.
Articles in this Series: Part 1 Part 2 Part 3

Author: Lee Brimmicombe-Wood
