

![]() Storming the Heights is the latest entry to hit the GMT P500 from Consim Press. This release covers one of the first major battles of the Crimean War, the Battle of the Alma, fought on 20 September 1854. This game models in a highly-playable format the key elements of the battle — command control (lack of generalship), weaponry, and tactical formations — and aims to captivate players with its strikingly beautiful period map and counters designed by graphic artist, Terry Leeds.
Storming the Heights is the latest entry to hit the GMT P500 from Consim Press. This release covers one of the first major battles of the Crimean War, the Battle of the Alma, fought on 20 September 1854. This game models in a highly-playable format the key elements of the battle — command control (lack of generalship), weaponry, and tactical formations — and aims to captivate players with its strikingly beautiful period map and counters designed by graphic artist, Terry Leeds.
We hope you enjoy Joseph Miranda’s inside look into Storming the Heights and will preorder this game with confidence!
— John Kranz, Consim Press
Overall Approach
The Crimean War battles were not Napoleonic warfare (even though the troops were more or less the same uniforms), nor even American Civil War style clashes (even though they carried more or less the same weapons). What you had here were parade ground armies and, more critically, parade ground commanders, colliding on the field using live ammunition. So when it came to Storming the Heights for Consim Press, I had to rethink the approach to modeling 19th-century tactics.

Command
Command control was interesting at the Alma insofar as there wasn’t any generalship to speak of!
Lord Raglan, commanding the British army, gave one order for the entire battle: “The infantry will advance.” He seems to have seen his main role as providing inspiration for the troops and, who knows, maybe he was right. He took up a position on a hill that was actually within the Russian lines from which he could be seen by his army and, since they stormed the heights, perhaps he was on to something. St. Arnaud merely waved his hand towards his French regiments and informed his generals, “With troops such as these, you need no orders.” On the Russian side, Menschikoff was a little better — he did attempt to move reserves around the battlefield, though he never got things quite as far as executing any overall plan of action other than reacting to the moves of the Allies.
So in the game, commanders have a few basic roles — setting overall objectives, moving some nearby units, providing a die roll modifier here and there. Where there was plenty of initiative was in the lower echelons of command. Lower-level commanders appreciated the local situation and acted accordingly. Hence, units are rated for initiative (rather than morale) and — critically — players have some leeway in which units can move even when they receive mandated commands such as “Onwards!” The assumption is that the lower level commanders can see opportunities and will act accordingly. You will notice at times that it is better to remove a low initiative commander from the radius of his units and let the troops take the initiative themselves.
I included the capabilities of brigade commanders into the divisional headquarters, which is consistent with my philosophy of the design. When using their optional full cavalry division, the British receive the heavy (Scarlett) and light brigade (Cardigan) commanders, and not the divisional commander (Lucan), largely because the animosities between the latter two.

Combat Factors
British and French infantry were armed with rifled muskets, with the exception of the British 4th Division. So they get higher combat factors. But that is not all. British linear tactics put all of a unit’s firepower “up front”, so British infantry battalions have higher combat factors. At the other extreme, the dense Russian columns only allowed a minority of troops to use their firearms. On the other hand, once a Russian regiment could get moving, it had considerable shock effect, if it could make contact with the enemy. The French were in between, using their columns, which were actually a series of lines.
Zones of Control
At first I did not want to use zones of control, but instead give non-phasing units the opportunity to shoot at, or counter-charge, enemy units that moved adjacent to them. But on further thought I decided to go with rigid zones of control. Why? We are dealing with commanders used to the parade ground. Upon contact with the enemy, they would stop and engage. Even if they saw a hole in the enemy line, they rarely would make any attempt to exploit it (nobody here is using World War One infiltration tactics). In any event, the smoke and confusion of the battlefield mitigated against too fancy maneuvers at the lower levels, so if you hit the enemy line, you are basically stuck.
Formations
These are pretty flexible. The reason is that lower level commanders were quite adept at maneuvering their men within the scale of an individual hex. So there are not a lot of involved rules for flanking and changing facing. Instead, it is assumed that battalion and company officers are making these evolutions without having to be micro-managed by the army commander. All those parade ground drills did have some benefit.
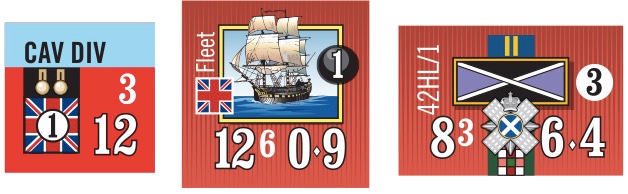
The different counter sizes are intended to give a sense of the formations in which the units fought. So you have ponderous Russians going up against more nimble British and French units. There is some subtlety here. For example, since Russian cavalry is shown as mass counters, while Anglo-French is shown as linear, this means the Allies can get two regiments into a single hex as opposed to one Russian and are therefore more effective in Melee combat, as was the case.

Combat Resolution
This is relatively simple. I wanted the real decision making to be at the level of command control as players attempt to get their armies to move in the right direction. Combat results change qualitatively as one gets to the higher level columns. And there are two ways to get there: either pile on more units (and, therefore, put more troops in harm’s way), or exploit the column shifts available. You have to think in terms of getting the right advantages before rolling the die, rather than computing the “perfect” odds.
The differentiation between combat results for the Fire and Melee tables represent the impact of musketry versus cold steel. The more lead you fire at a target, the greater the chance of inflicting losses. But numbers count for less in a melee. A charge against a disrupted or shaky enemy line will break through, but the same attack will be repulsed if going up against well-disciplined troops, regardless of the odds–see the stand of the Thin Red Line at Balaclava.
The way the CRTs are set up, it is difficult to destroy an enemy unit in a singular blow. As was the case historically, you have to engage in a prolonged firefight, or use the fire-melee combination. It’s also best to attack enemy units that have a low probability of recovering good order from disruption. And there is always the chance for something totally improbable occurring, such as a Charge of the Light Brigade.
Combat results are in terms of disruptions and eliminations. The critical factor was whether or not a unit could maintain its cohesion, not casualties per se, so units are not attritioned via step losses. Historically, battalions formed up with reserves and supports such that casualties in the firing line could be replaced by companies or ranks in the rear moving forward.
Melee combat does not use odds based resolution. The reason is that enemy units rarely came close enough to cross blades/bayonets, though there were a couple of exceptions at Balaclava. Melee combat was more of a morale contest, or close order firefight, as shown in the combat results. One side would have enough and break off, sometimes before they engaged. If you look at the Charge of the Heavy Brigade at Balaclava, the British cavalry charged a numerically superior foe and forced it back. The usual way to show this sort of thing in a wargame would be with all sorts of die roll modifiers, but it is much simpler to do it by removing the computation of odds.
I integrated morale effects right into the combat results with the MC results. This avoided having to make separate initiative checks. Melee attacking with small controlled charges often works better than piling on more units.
![]()
Skirmishers
It was common among the armies of this period to deploy a screen of skirmishers, drawn from battalion or regimental companies to the front and flanks of their units. Skirmishers are accounted for in the game by the range of the infantry units, which is one hex longer than it would be given the range of the weapons, as well as the ability of certain units to fire to the flank. The idea is that they are screening outside the unit boundaries. The skirmisher units that are formed by breakdown represent a larger application of this principle.
Cavalry also deployed skirmishers and occasionally engaged each other with fire, but this is figured into non-charge melee combat situations.
Army Morale
This goes up and down with casualties and objectives taken. You get more points for eliminating artillery because of the contemporary obsession of not losing any guns. Also, British cavalry is worth more points, representing the reluctance of Raglan to risk what was a small, elite force of horsemen.
Victory Conditions
These are relatively simple and reflect the military mentality of the time. You win by taking the field and disabling (not necessarily destroying) the enemy army. There was also the added consideration of the Allies having to move south as quickly as possible to get to Sevastopol before the Russians could organize their defenses there.
Order of Battle
This took a bit of research as the English language sources concentrate on British (and, oddly enough, Russian) forces, minimize the French and ignore the Turks. I gave a few units higher ratings owing to superior battlefield performance or better unit level leadership. Some of the apparently weaker unit, such as the British 4th Light Dragoons, were understrength at the battle owing to detachments.
Miscellany
There were a number of other things I thought of including but decided were best subsumed by game functions rather than writing special rules for them.
British infantry battalions have a slightly lower movement factor than French and Russian units. The idea here is that the extended linear formations that the British used required considerable alignment, and could be easily disrupted by rough terrain. Rather than adding in lots of special rules to account for all this, it was much easier to reduce in British movement rates.
The French were held up after storming the Alma Heights because they could not get their artillery forward, and doctrine said no advance without the guns! I factored this into the relatively low initiative ratings of the French line infantry, as well as the overall considerations that make it viable to keep a division together for command purposes.

Joseph Miranda
In conclusion, Storming the Heights is shaping up as a beautiful and eminently playable game covering The Battle of the Alma. The idea is for the player to adopt the persona of a Crimean War general and run the battle from the perspective of a Raglan, St. Arnaud or Menschikoff. With your support of this, my first Consim Press title, I look forward to future designs covering subsequent battles during the Crimean War.


Author: John Kranz

I’m sorry this interesting design is not approaching 500 faster than it is. I just finished reading Saul David’s VICTORIA’S WARS and was looking for Crimean War games and there’s not much out there. I’ve dusted off my copy of SPI’s old Crimean Quad and have a French version of INKERMANN, but an up-to-date, state-of-the-art Battle of the Alma would be nice to have before I grow too old to read the counters. I hope interest picks up.