

In the previous articles in this series, I discussed the high-level concepts behind the Solitaire TacOps system and how they are represented in the components of the game. In this article, I will walk through how players interact with those components to play out their own strategic approaches to historical engagements.
Flow and Pacing
The play structure of Solitaire TacOps is designed for its scale. Turns during any engagement will represent between 2 to 20 minutes of activity, higher on the regional maps, lower on the urban maps. During each turn, both sides will have an activation phase, though their sequences are different. The player will get a maximum of five activations during their phase, which can be used for a single unit or distributed across any number of friendly units on the map. During their phase, the Germans will activate their units on the map if they have any and resolve the actions of their contact markers.
Unlike many tactical wargames, time is not presented in a linear fashion. All of the activations for both sides in a turn represent their cumulative effects, not a sequence. As an example, movement does not trigger immediate opportunity fire. However, in a subsequent phase, a contact marker might fire on that unit because of where it moved. This allows the player to focus fully on their actions with minimal interruptions, then focus on the opposition reactions and vice versa. As a solitaire game this is important for maintaining a manageable flow for the player.

This also falls in line with the scale being represented. Even on urban maps at the lowest scale, the smallest unit is still more than one soldier. When that unit is racing across the street to the cover across a building, while exposed in the street, in line of sight of an opposition unit that could indeed be firing as a reaction, it would not necessarily be effective. The soldiers are not making themselves easy targets. They spread out, use the environment to conceal and may even have suppression fire to assist. These are all abstracted in the player moving the counter two hexes, so that that simple action does not get bogged down by checks and rechecks that give similar results. When the contact market sees the unit fired on later, we can learn that opposition fire just as the unit reached the building in fact kept them from entering cover leaving the unit exposed in the street.
Another part of keeping the flow of the game smooth is that everything is resolved with the same die rolls. It modifies the dice system from the role-playing game Ironsworn, using one d6 to represent the player and two d8 to represent the opposition. These are rolled together with modifiers being applied only to the player’s d6. If the player’s roll is equal or higher to both of the opposition rolls it is considered a success, equal or higher to only one is a mixed result, and lower than both is a failure. Outside of the opposition’s actions, Mixed and failed results are likely to place contact markers for the opposition.
To Turn a Phase
Each turn begins with an initiative roll where success and mixed results give the initiative to the player while failures give initiative to the opposition. This determines two things, which activation phase will happen first and also the number of activations the player will receive based on the difference between the highest die and the lowest die. The range of outputs here can have a serious impact on play. You could win initiative but only have one activation, or lose initiative with five. Setting oneself up at the end of a turn is no guarantee you will be able to complete your plans as the opposition can steal initiative.

On their turn, the system always runs the opposition through the same steps. Any units on map will move in their posture direction and attempt an attack when possible. After all of those units resolve their actions, any contact markers in megahexes with player units will be revealed. Finally a set of actions are taken based on the current opposition posture. Combined this makes the opposition very responsive to the game state in a way that is dynamic and clear but not always predictable. Some opposition turns can be uneventful, but some of them can feel like well coordinated maneuvers a live thinking adversary might make.
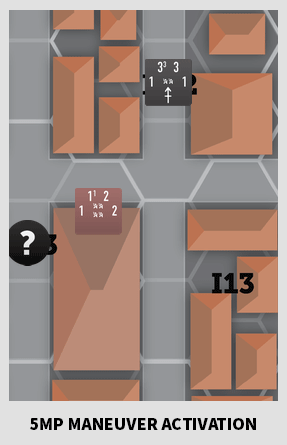
For each activation of their turn, the player must choose a hex to activate, and the action they would like to take from it. There are only three actions to choose from – Attack, Work, and Maneuver. They then make a resolve roll to determine the result. Scenarios provide the player with command points which they can spend to extend the activation to the adjacent hexes. Command can also be spent to modify die rolls. It is a very valuable resource but limited, so choosing when to spend command is critical.
Time for some Action
The Attack action engages the activated units in combat. Combat can be ranged, close, melee, or ordnance fire. Except for melee, only one unit’s stats will be used. This is because these are not measures of strength but of effectiveness. It is only when units end up on top of each other in melee that the strength of stacks are summed. Ranged and close combat will always face the defensive rating of awareness but again of just the highest value in the target stack.
Ordnance fires place barrage markers in target hexes with scatter determined from the resolve roll. Depending on the strength of the ordnance, the player will roll multiple ordnance multiple times with some drift in between. In addition to damaging armored units, on urban maps, barrage markers can damage buildings which can create rubble in the streets.
Scenarios also provide the player with a set amount of ammunition. While it is limited it is not a literal representation. Any time combat involves a higher effectiveness rating one ammunition has to be spent. When all the ammunition is spent the effectiveness rating across all units gets reduced to just one.
There are no forced retreat results from combat, but the defender can choose to retreat to avoid a second hit result. Additionally, the first hit that any stack takes adds a casualty marker to the stack. As long as that casualty is with the stack, any hits the stack takes after that must be taken as step-losses to the units. All of the stats of every unit in a hex with a casualty is reduced by one. Taking casualties makes units less effective.
The Work action is focused on completing tasks, including searching to clear an area, rallying to unpin, redeploying units in a hex, digging entrenchments, building a bridge, spotting for ordnance fire calling back to headquarters and more. Each task has a cost. Some might be completed in a single activation, some may take multiple activations to complete.
Freedom of Maneuver
The last player action, Maneuver, is intentionally the most flexible. The results of Maneuver resolve rolls can provide the player with a number of Maneuver Points (MP). They must first spend MP to move the activated units to at least one hex. Anytime after the first hex they can choose to continue moving or stop and spend their remaining MP to take one of the other two actions.
Maneuver uses the Awareness stat for its resolve rolls. This is a heads up awareness that allows them to find the effective position needed to carry out actions. While most of the time players will simply use Maneuver to move, they will always look for how they can exploit their movement to do more. The game, much like the historical situation, demands players learn tactical maneuvers to effectively complete objectives.
Most of the scenario missions involve controlling and/or holding one or more key megahexes. The missions will have objectives that players most complete sequentially. As they complete an objective, or if they realize they cannot complete one, they call back to HQ to report their progress. HQ might tell them to move on to the next objective, have them hold their positions or even tell them to withdraw. HQ is expecting a report within a certain number of turns per objective. It is fine to call in before but being late can create future problems.
All of these mechanics work to represent the dynamics of warfare representative of their scales. Players will develop their own strategies for completing scenario missions, which involve setting up effective maneuvers that help them earn territorial gains. Ortona’s historical scenarios will see them building bridges across the Moro, fighting off counter attacks at Villa Rogatti, fighting their way out of the Gully, surpassing the rubble on Corso Emmanuele, street fighting in the Piazza and more. Players are given scenarios for the engagements that made the Battle of Ortona what it was, to understand the tactical challenges faced by the Canadian First Infantry Division, and come up with their own plans to overcome them.
This concludes this series of articles for this year. We will be hard at work continuing to develop this into the great experience it promises to be. In the new year, we will share a new series of AARs that will show the mechanics in action and talk more about the strategies that come out in play.
Previous Articles:
How Scale, Effectiveness, and Maneuver Inform Solitaire TacOps
Solitaire TacOps: From Double Blind to Solitaire
Solitaire TacOps: Dynamic Hexes and Counters


Author: Non-Breaking Space

I follow the descriptions of the new game but are not attracted by the design of the counters. Counter design is a very important element to buy a game. Is the counter design final? Thanks, Frank