

Here are links to the first two articles in this series: Part I Part II
Welcome back to the overview of the solitaire system for Fields of Despair: France 1914-1918. A huge thank you goes out to everyone who has helped us get across the 500 order mark. The development team and I are thrilled and humbled at the same time. Now on to the game…
This article focuses solely on how the game’s AI plays the Central Powers against you. As is custom, I should note that all of the components, art, etc you’ll see are play test and a work in progress. Below is a prime example. The Central Powers side of the Solitaire Play Aid walks you through the Central Powers action phase. I’ll refer back to it as I go.

Historical Narrative and the Spring Offensives
The 3-turn solitaire scenario opens with turn 7, the Central Powers have just spent the winter of 1916 not only constructing the Hindenburg Line, but adapting a defense in depth strategy along the entire front. As the player, turn7 will feel like you are just hitting your head against the wall. At the start of turn 8, Russia collapses sending most of the Central Powers eastern divisions to the Western Front. Bolstered by the arrival of new units, the Spring Offensives are launched. Now, you as the player must simply hold on. The end of turn 8 and all of turn 9 then become a race against the historical clock to push the Hun from France and advance into Belgium and Germany.
The die roll modifiers to the Central Powers offensives table are designed to encourage not guarantee a more historical rhythm to the scenario. Here’s how it all works.
Re-establishing the Fog of War
Let’s begin by re-setting the scene. You have just completed your action phase and whether by aerial recon or ground attack, you have revealed some enemy blocks. In the 2-player game, a player begins his turn by standing up any blocks revealed during an opponent’s turn. Solo play is no different. The revealed Central Powers blocks are turned over and reduced to one block. The value of that block does not matter thus resetting the Central Powers blocks to a hidden position as they were at the beginning of the game.

Why? Simply put, blocks are hidden this way because they are about to move. The German defense is not stagnant. Quite to the contrary the blocks may not only move but they will likely attack you as well. Here’s how it works.
Determine the number of Central Powers offensives.
The number of offensives is determined by rolling 3d6 adding any die roll modifiers (DRM) and checking the result against the “Number of CP Offensives” table. The results a number of major and/or minor offensives as well as the possibility of no attack at all. Here are the tables in their current form.
Central Powers: Major Offensives
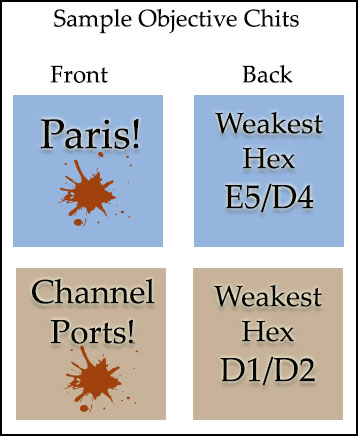 To resolve a major offensive you must first draw an “objective chit” and place it on the map. Objective chits give the strategic objective on the front and the specific attack hex and tie break order on the back. Here are a couple of examples…
The top objective chit tells you that the Central Powers objective is to take Paris! The attack will occur in either in hex E5 or D4. To determine, count your total block CV in each and the weaker of the two is attacked. In the event of a tie E5 is attacked. Allowing the AI to attack the weaker of the two is intended to simulate a successful aerial reconnaissance on the part of the enemy. You may have noticed they skipped air recon at the start of their turn. This speeds up play.
With the attack location determined you are given the option to reinforce provided you have a Logistic Point available to spend. Solitaire play limits the reinforcement to a maximum of 5 block CV total. More on this decision later…
How Strong is the Offensive?
Once the decision to reinforce or not is made, you must now determine the size of the Central Powers attack. Remember that table I keep saying is so important? Here it is again. Note the “revealed” value has been rest to the current number of frontline hexes. When the Central Powers blocks re-hid, the table was reset.

The “Central Powers Block Combat Value” table tells us that the sum total of the Central Powers blocks in play is 105. Of that, we know (or assume) that at least 1 is in each frontline hex. For this example let’s assume there are 14 frontline hexes. The “Revealed CV” marker is placed at 14 leaving 91 hidden.
Is the first offensive always the strongest? Is reinforcement and easy call on the first attack? Nope, no way. In our example you will roll 3d6 on the “Major Offensive” table. With 91 block CV hidden, you use the 76+ column.

Agonizing Decision
Back to the decision to reinforce or not…If you roll high on the major offensive table, reinforcement was probably a good idea. BUT if you roll low, let’s say an 8 for example and the strength of the attack is only 17, reinforcement was not only a waste of a Logistic Point but you’ve weakened your line elsewhere and you noticed how the objective chits target weak spots. The second offensive could strike the hex you just weakened to reinforce the other AND with your luck that’s when you roll high on the Major Offensive table!
Once the size of the offensive is determined, the amount of “Revealed CV” is increased. As the “Revealed CV” and “Total CV” draw closer together your situational knowledge increases and the likelihood of a large offensive against you decreases.

Combat Resolution
Combat resolution follows the core rules. If the Central Powers have any artillery available to them you will use the “Artillery Response Tables” the same way that you did during the player turn. If the Central Powers clear you out of the hex, place a “Breakout Move” marker.
Combat resolution affects both the “Revealed CV” and “Total CV” reducing each one by the total number of hit you score during combat.
This process is repeated until all major offensives are resolved.
Minor Offensives
Minor offensives follow the same procedure as major offensives. The main difference is the table provides much smaller attacks.

Design Note: Play testing quickly showed us that the minor offensive fails miserably almost every time. They are almost suicidal. Often times the Central Powers are wiped out in No Man’s Land before rolling a single die. While not a very smart move, they feel very thematic during play. In game terms a simple representation of a bad move a human player might make.
Breakout Move!
Breakout movement is a work in progress. In general, it follows the core rules with guidelines for strength and direction set by a decision tree. We want the AI to advance in a manner most likely to give you the biggest headache possible. At the same time we don’t want to have it advance out of strong defensive positions. You can see where I am with it by looking at “(7)” on the player aid at the top. More on this as it develops.
Re-establishing the Fog of War
At the end of every Central Powers action phase the solitaire procedure sets the game up for the next Allied action phase. See: (9) on the player aid at the beginning of the article for details. The procedure varies by action phase because strategic movement follows action phase two effectively re-hiding all of the Central Powers blocks. This puts you, the player, in a unique position between action phases 1 and 2. Central Powers attacks reveal their blocks giving you added intelligence for your move. It’s important for you to make the most of this additional information.
Feedback?
We always welcome any feedback and questions that might get us thinking. The best way to do that is to reply tous here or over at our CSW Discussion Board or BGG Topic.
We hope you have enjoyed this look inside the Solitaire Design forFields of Despair: France 1914-1918.
Solitaire System for Fields of Despair Part 1
Solitaire System for Fields of Despair Part 2


Author: Kurt Keckley
Designer, Fields of Despair
