
By Mark Herman
Introduction
With Army of the Potomac soon to arrive in America I thought this would be a good time to discuss advanced assault tactics in the Civil War Heritage series. The combat system for this series does not conform to anything that I have done before, so I feel it is worth discussing in some detail. The main point is the Rebel Fury/Army of the Potomac combat system is meant for you to experience and see the historical combat narrative that’s in every book on this topic.
If I think about my professional origins at SPI, combat results tables (hereafter CRTs) were matrix results tables also called nomograms that typically cross-referenced force ratio columns and die roll results, with modifiers to shift the columns left or right and/or drive the die result up or down in a column. Each force ratio column had a distribution of researched results that could be expressed as a probability. We grognards knew that shifting right and advantageous die roll modifiers were good things to focus on. Broadly each time we rolled the die we got a result. Skill was demonstrated by stacking up as many advantages and forces as possible that more or less assured the desired outcome. Think of this as CRT nirvana, but note it was and remains a game mechanic that creates a game outcome. Often, we have to supply the narrative for the combat result. What I created for this ACW grand tactical series is a deeper dive into the choreography of combat as described in the contemporaneous field officer reports.
But first let’s talk about baseball. I love baseball and its statistics are not unlike those experienced during the American Civil War. All Hall of Fame players have a batting average in the low-.300, meaning that they got a hit about one third of the time. Even the great Ted Williams who hit .406 (1941 season) had a lifetime average of .344. Just for completeness the highest career average was Ty Cobb with .366. If you disagree, you can check the baseball Hall of Fame website. During the American Civil War at the grand tactical level, statistically like baseball, one out of three assaults succeeded. These are the statistics that are baked into the Civil War Heritage series combat system.
As of this year I have been designing wargame combat systems for half a century, but I have evolved. When I did Rebel Fury, I wanted the combat system to tell a stronger, more aligned narrative that conformed to the ones in the official reports and history books I have read since I was six years old. My intent is for you to experience two out of three failed assaults, yet by using historic tactics still prevail on the field of battle. In short, I created a
combat system predicated on multiple assaults (die rolls) to give you a more nuanced battle narrative. This perspective is not the one and done resolution which has been the norm since the first Gettysburg game (AH 1959). For some, this is heresy, but for me this is exactly what I wanted to accomplish. When I play Army of the Potomac campaign, which I do frequently, I see the grand tactical assaults that match what I have read across a lifetime of research on this topic.
The purpose of this article is to discuss advanced Rebel Fury tactics around the systems mathematical model and the combat narrative they are designed to illustrate. As an historian who designs wargames, I will use an actual situation from the Battle of the Wilderness scenario in Rebel Fury to demonstrate what you should be thinking about if you want to play this design well. If you get easily frustrated by more failed attacks than successes, stay away from this series of games, but if you want to gain more perspective on ACW combat, read on.
Historical Situation
Note: All hex references and situations are based on the Rebel Fury Wilderness scenario.
On May 4th the Army of the Potomac crossed the Rapidan river to turn the Confederate right flank that was bivouacked west of Mine Run in the Wilderness. The Confederates had an excellent observation post on Clark Mountain that could see across the river into the Union encampments. Prior to the campaign, Robert E. Lee visited this post several times and ultimately gained about a half a day’s warning that the Union offensive had begun. It was Lee’s intention to shift his army onto the right flank of the Union approach march, but he did not want to fight on the 5th, but on the 6th when his first Corps under Longstreet would arrive from Gordonsville. He gave his IInd Corps (Ewell) and IIIrd Corps (A.P. Hill) explicit orders not to bring on a general engagement. On the morning of May 5th, A.P. Hill’s IIIrd Corps, and not surprisingly, Heth’s division in the lead seemed to have taken the opportunity to reprise their actions at Gettysburg the previous summer by attacking the Union Cavalry van at Parker’s Store (hex 2011).
On May 5th, the Union army was arrayed as they are shown in the Wilderness scenario set up. The blue arrow shows the Union plan of operations to turn the Confederate right flank at Carpathian Road (hex 1012, entry A). The gray arrows show the Army of Northern Virginia’s initial probes along the Orange Turnpike (CSA IInd Corps) and Orange Plank Road (CSA IIIrd Corps).
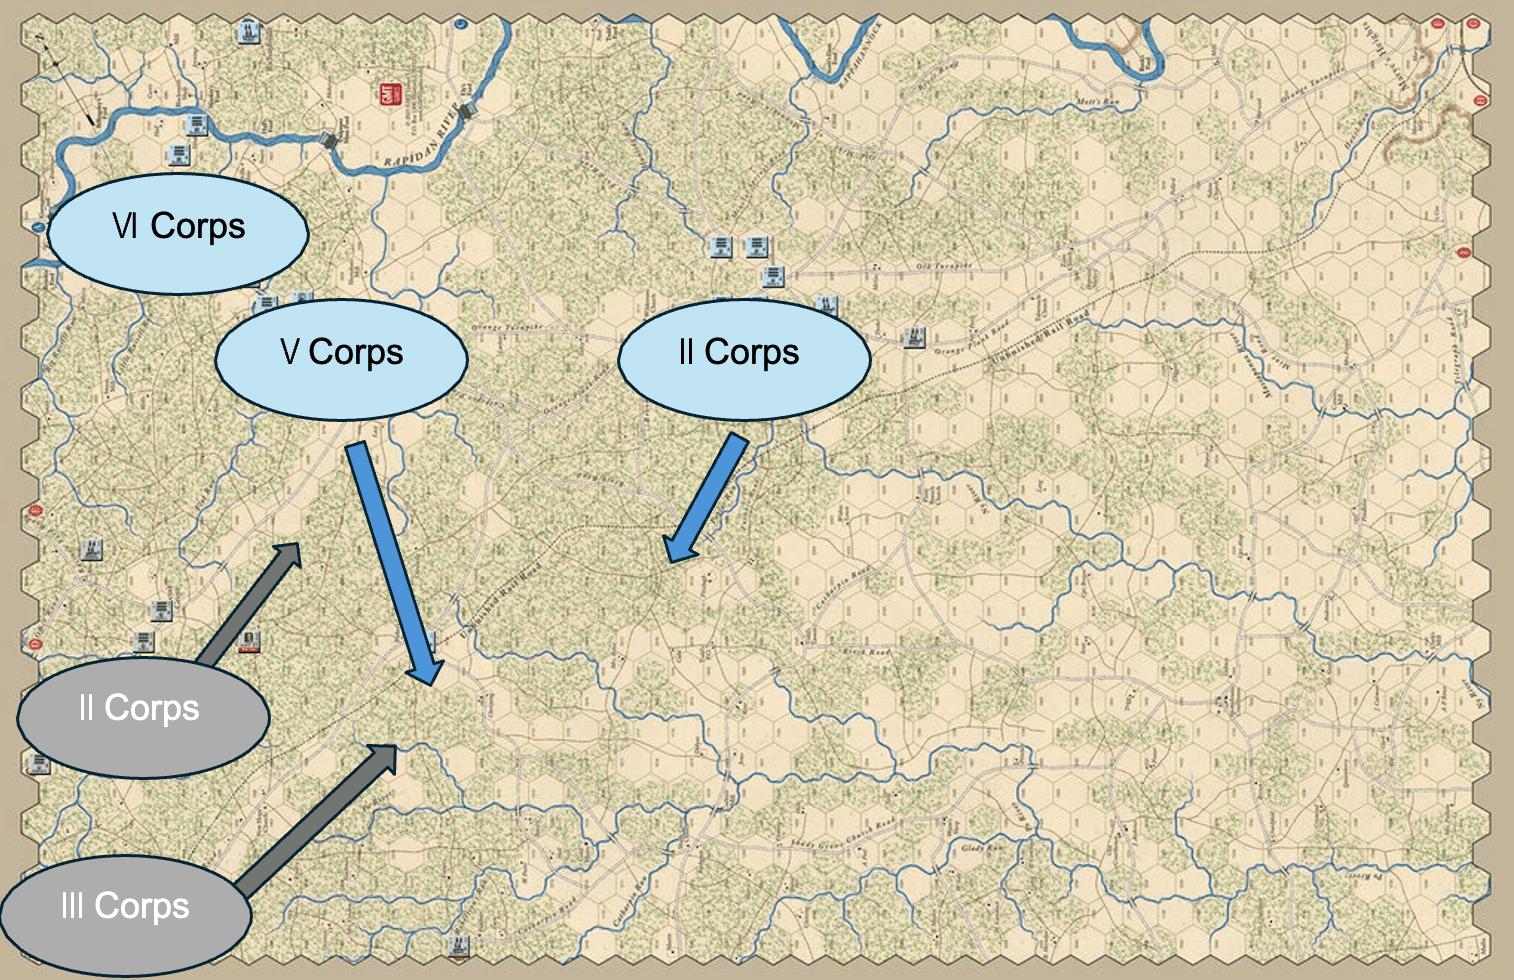
Illustration 1: Blue arrow shows the planned Union route of march when the Union cavalry at Parker’s and Union pickets detected the massing of Confederate infantry on the Union right flank.
At 7:30 am on May 5th, General Meade, in command of the Army of the Potomac, reported to General Grant (located near Germanna ford hex 3401) that he was halting the army’s advance and deploying to launch an immediate attack on the Confederate advance. Grant readily agreed, but by 10:30 am (turn 1), General Warren, Vth Corps commander, had yet to organize an attack primarily because Generals Griffin and Wadsworth refused multiple direct orders to attack.
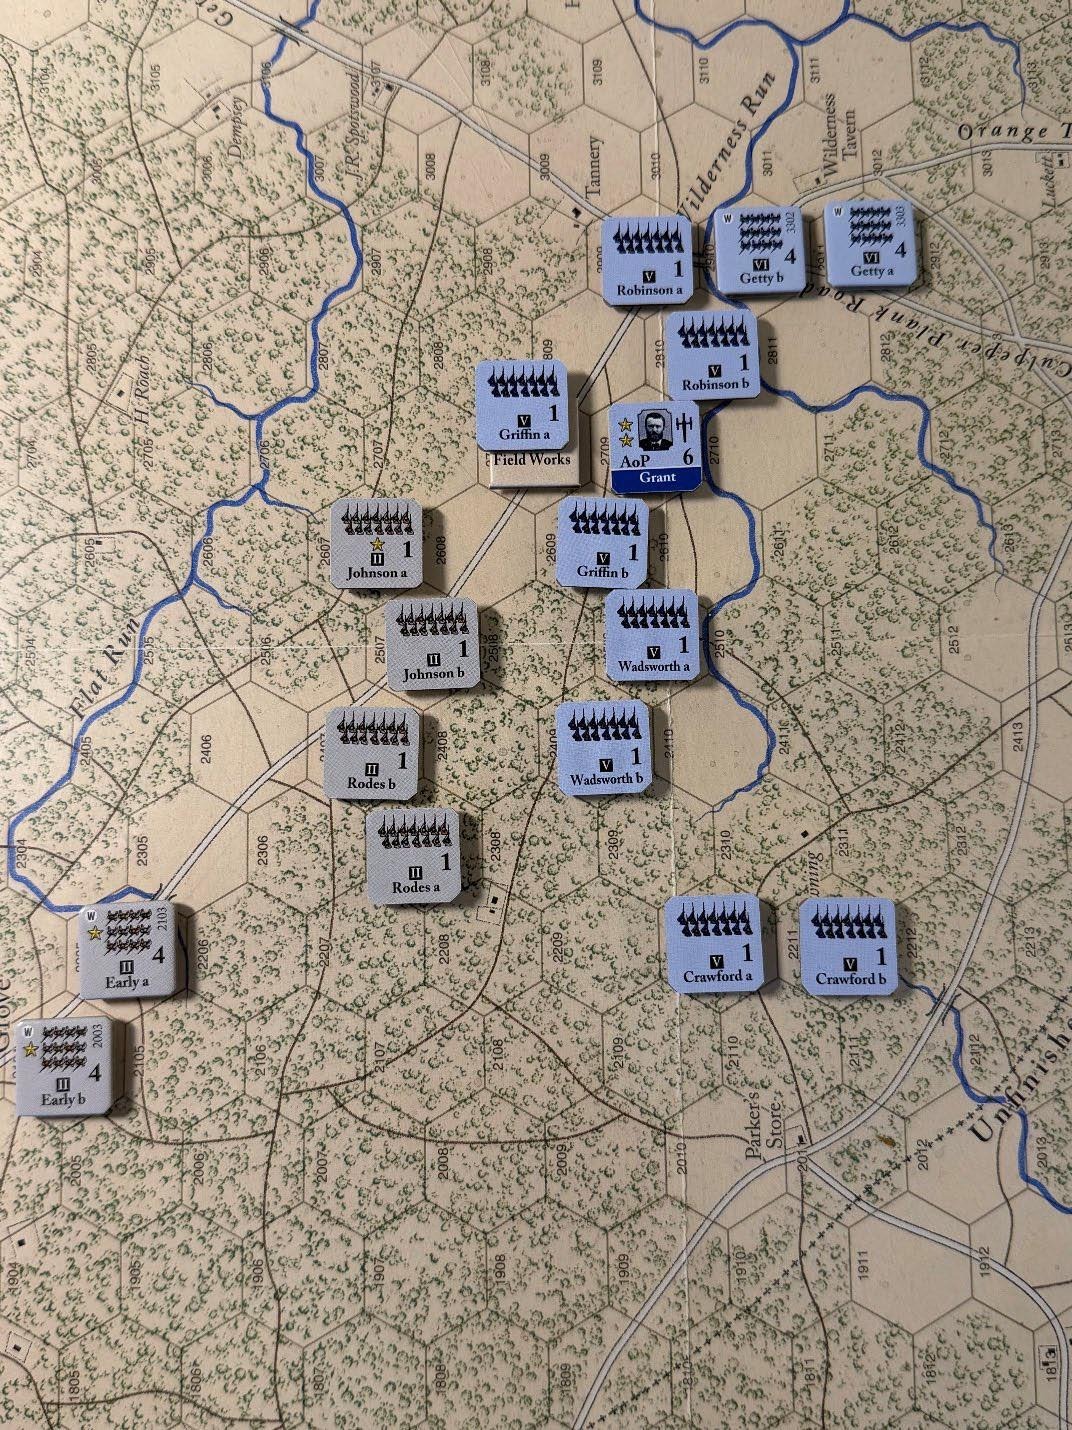
Picture 1: Beginning of the May 5th PM turn.
At around 1 pm (turn 2) General Grant (Lacy house, hex 2709) finally interceded ordering Generals Wadsworth and Griffin to immediately attack without regard for their flanks. The above picture shows the positions of the Union Vth Corps and the Confederate IInd Corps just prior to the beginning of the May 5th PM turn.
The next picture shows the Vth Corps in its assault positions just prior to the combat phase.
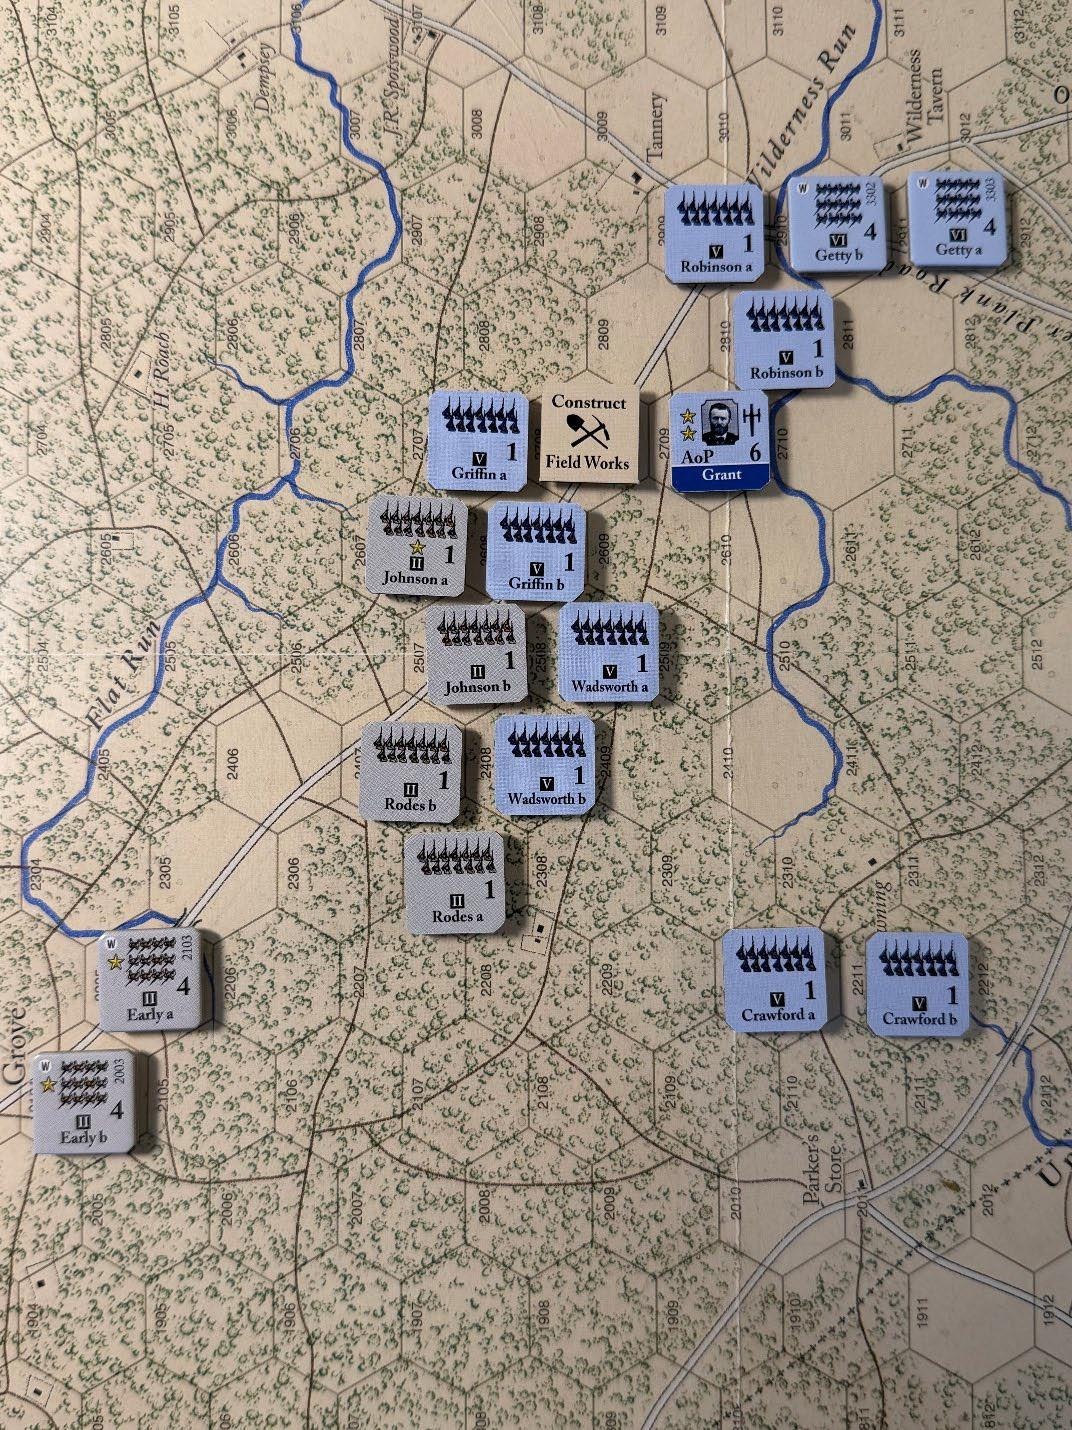
Picture 2: End of May 5th PM movement phase, just prior to combat. Note: the Field work on its construction side would actually be removed when the hex was vacated, but I wanted to show where Griffin’s defense position was located prior to his advance.
With this as preamble we will now examine in some detail how to execute an assault in Rebel Fury, but note General Griffin is doing so under protest. This is the Civil War and it should come as no surprise that in the majority of cases, assaults were late and uncoordinated, this example being one of the reasons why.
Advanced Assault Tactics
In Rebel Fury, taking more time (moves) than necessary to get into position closely mirrors a delayed attack as it gives the enemy extra time to continue developing a well-placed defense. As all wargames are alternate history, I will now explore how things might have progressed if Meade’s original attack orders had been followed at 10:30 am (turn 1 instead of turn 2). I will use this example as the basis for a very detailed discussion of the Rebel Fury combat system and the mathematics it is based on.
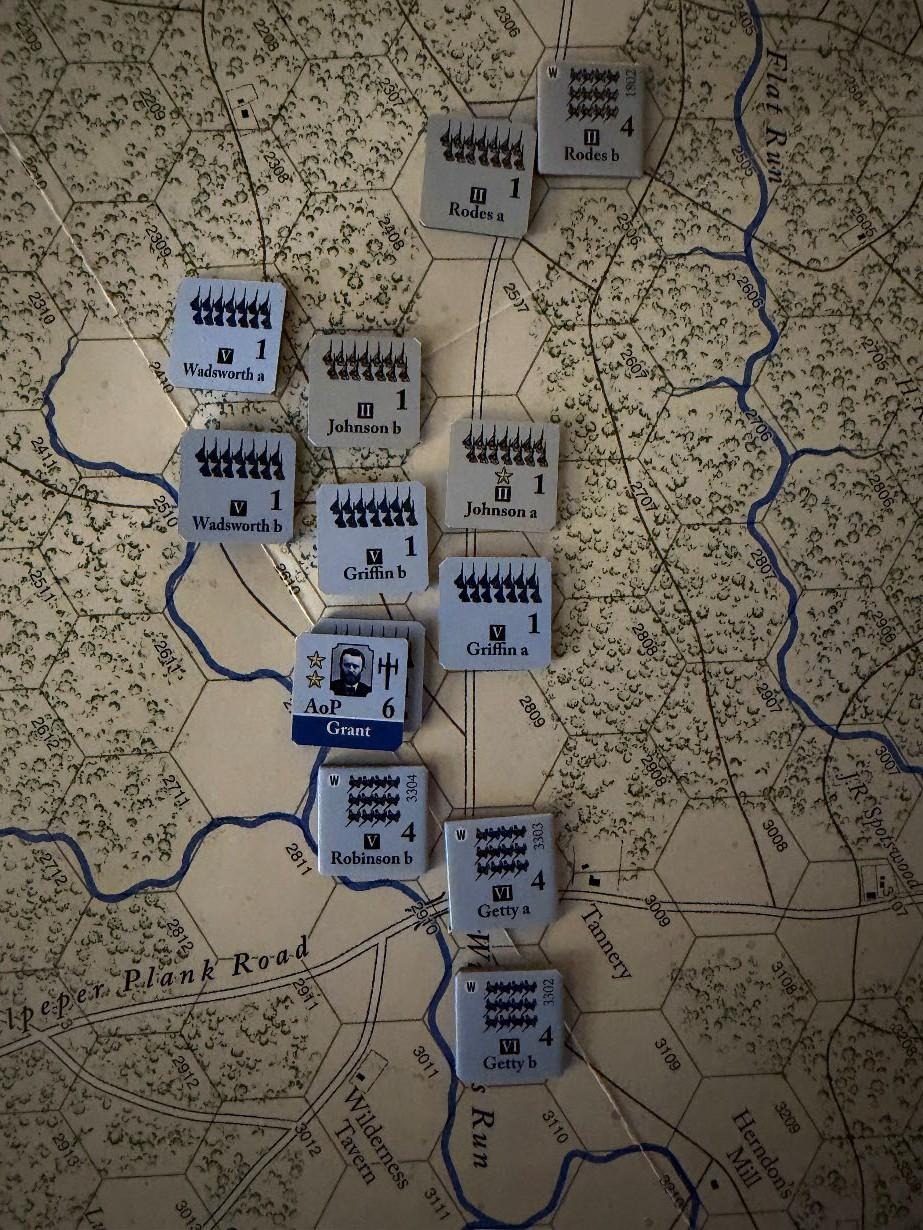
Picture 3: Battle of the Wilderness (Wilderness/Spotsylvania map): Historic unit positions for May 5th 10:30 AM as the Union Vth Corps assault begins. Note: Grant HQ (battle mode) is in its historic location near Lacy House hex 2709.
I apologize but I will have to use a little bit of math. The more detailed description will be found in the Army of Potomac playbook article. Consider a coin toss where heads you win,
tails you lose. So, what is the probability that you will achieve at least one head result in three tries? Well, we all should know that you have a 50% chance of flipping either side of the coin. The probability of tossing at least one head across three tries is 87.5%. Rebel Fury’s combat system works in the same way.
Note, all throws of a die are an independent event, so all statements on multiple attack probabilities are calculated before rolling any dice. Once dice are thrown, the probabilities change after each assault is adjudicated. The trick is to commit to ride out the assault plan despite initial failures, which is how you experience the risk calculus of a Civil War army commander.
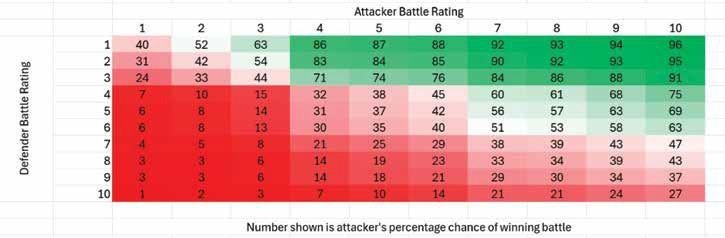
Table 1: Tactical Position Determination Win Probability Table: created by Dr. David Casper
The above table calculates the probability of combat success for any combination of attacker and defender tactical position ratings. Results highlighted in green represent a 50% chance or better of success, whereas results in red represent less than 50% chance of success. The color gradations give you a visual sense of how much above or below 50% a given probability represents numerically. The colors should make it clear that there are several breakpoints in the combat system, but the main one is you should always try to attack at a tactical rating equal to the defender as that generally represents, like baseball, a one in three chance of success.
Pulling this concept into a ‘rule of thumb’, two sequential attacks at the same combined tactical ratings (broadly 33% single assault chance of success) will yield an overall 55% chance of success (think coin toss) and over three attacks an overall 70% chance of success. What I have essentially done is disaggregate an attack into its constituent components to give you player agency over the frequency and intensity of combat. My intent is for you to not only achieve historical rates of success but offer a window into a Civil War army commander’s risk calculus. What I did not want in Rebel Fury was to use a
20th century lens to view 19th century decisions. The question the Rebel Fury is asking is whether your resolve is as hard as General Grant? Grant lost over 50k casualties in one month, the majority occurred in the first two weeks in May. Grant lost almost every engagement against Lee except the last one. He understood the terrible math of the American Civil War, and I wanted you to see it up front and personal. That is the story I wanted to see play out at the grand tactical level. Likely not everyone’s cup of tea, but plenty of other choices on this topic that do it more traditionally.
When you want to attack, you need to plan on making at least two and better yet up to three assaults to capture an enemy position. At times the first attack will work (e.g., Missionary Ridge), but that is going to be the exception and not the rule. If your first assault fails and you stop the attack, you should never have attacked in the first place. Basically, if the objective is not worth the investment, disengage and maneuver to gain advantage, better yet a significant advantage. But know, it is hard to win if you do not get to where you are going and at some point you have to go through, not around, your opponent’s army to get there. While the grand tactical scale emphasizes maneuver, it is the Civil War and at some point you have to engage the enemy in bloody combat.
When attacking, having a higher tactical position rating is better than a lower one. Just like any CRT rolling your die in a higher column is better (10 is the highest) than rolling in a lower column (1 is the lowest). Each column has a different distribution of results, but I have worked it out so there are no die roll modifiers while achieving the same mathematical construct with much less mental work.
So, let’s look at this historic situation and see how best to proceed. The Union plans on making three consecutive attacks interspersed with the CSA having similar opportunities. Historically the Confederate IIIrd Corps (A.P. Hill) were attacking down the Orange Plank Road toward Parker’s Store (hex 2011) while Ewell’s IInd Corps is digging in on the Orange Turnpike. The Union objective is to occupy Johnson-b’s position (see picture 3) to enable a flank attack on Johnson-a. As the attacker you look at Johnson-b and determine that the CSA tactical position rating will be 5 (minimum) and potentially 9 if they use artillery support that is yet to be determined.

Picture 4: May 5th AM turn simulating a 10:30 am attack on Saunder’s Field. The arrows show the planned five Union assaults that will be used in the following examples. Union assaults will be conducted starting with Wadsworth-a, then Wadsworth-b, concluding with Griffin-b. Johnson-a gives division integrity bonus to Johnson-b. Note that Johnson-b does not have a battle star whereas Johnson-a has a battle star to account for Walker’s brigade aka the Stonewall brigade.
The Union units if they attack in the sequence (left flank to right) are planned to be Wadsworth-a, if that fails Wadsworth-b, and if necessary Griffin-b. If the Union does not use artillery support or Grant, the first Wadsworth-a, attack is on the 4 column. A 4 tactical rating attack versus a 5 tactical rating defense has a 31% chance of success and across three attacks, the chance that you will knock Johnson-b back has a 68% chance of success. That is the secret sauce, you have to commit to an attack, or you should not make it.
Now if the CSA uses artillery support, it is a 4 versus a 9 rating, which is a 14% chance of success, which results in an overall 37% chance of success that is not a good attack.
Since artillery commitment is secret, here is how you should think about making this attack.
As a general rule you should be reticent to attack at less than a 7 rating. If you are attacking at less than 7, you want situations where the defender is equal to or less than your tactical rating. As the Union is committing to three attacks my plan is to use artillery support for all three attacks, which is three ammo points, so this better be worth it. I am not using Grant unless I have to make the third attack. My 7 tactical rating attack versus a 5 tactical rating is a 56% chance of success with an overall probability of 91.5% chance of success and if the CSA matches the Union artillery shot for shot, the overall chances of success are 67%.
If I flip the narrative around and look at it from the defender’s point of view, defending with a five rating and conserving my ammunition for a more important situation is a viable option. If Johnson-b is shoved aside or taken off the battlefield Johnson-a will be attacked in clear terrain, but as a rule it is easier to conduct an orderly retreat when your path to the rear is open. Worse case, Johnson-b gets a blown result and Johnson-a retreats. With Rodes in reserve the Confederate position is not seriously compromised and by conserving ammunition, I will have an edge later in the battle when my opponent’s wagons are running dry. That said, I have never seen a gamer in the beginning of a Rebel Fury battle conserve ammunition when their supply wagons are full. At least I have discussed the advantages of being conservative with your artillery ammunition.
For this article I ran this example ten times, which are recorded in the summary table to show that the math does in fact work. This is the first run of ten descriptions and what occurred. The first assault was Wadsworth-a supported with artillery, integrity, and attack support (tactical rating 7) versus Johnson-b in defensible terrain, artillery support, and Corps integrity (tactical rating 9). This Union 7 versus Confederate 9 assault on the Tactical Position Table resulted in Wadsworth-a becoming blown to return in 24 hours. Then Wadsworth-b attacked and forced a retreat. Now our historically reluctant Griffin-b attacked and scored a Significant Advantage versus a defender Advantage Attack result with the special die causing Johnson-b to become blown, success. Griffin-b cannot advance due to Johnson-a’s zone of control (hereafter ZOC). For purposes of these 10 runs, this is a success in that in the first three attacks the Union benefited from the 67% chance of success and took the position. This is the narrative that the CRT is intended to deliver that broadly conforms to the initial results from the actual 1pm attack.
Given the history of the Saunders field attack I followed the Vth Corps plan and continued to attack. The fourth attack with Griffin-b using no artillery to conserve ammunition but with
the direct leadership of Grant’s battle stars (Union 6 versus CSA 6, Stonewall brigade, with artillery in clear terrain) saw the infamous attacker 9 versus 0 defender dice roll, resulting in Johnson-a being outright blown: score now two blown to two blown divisions.
However, there is more. Griffin-b due to the presence of Grant in battle mode can advance two hexes to engage Rodes in a follow-on assault. However, the 9 die roll means that Grant takes a leader casualty check (1d10 plus two stars), which he survived (modified die roll less than 9).
Continuing to follow the history of the 1pm attack, Griffin-b advanced across Saunders field making a fifth attack against the CSA second line of defense (Rodes) and in a Union 6 v Confederate 6 assault resulted in a successful Confederate counterattack forcing Griffin-b to retreat. When the smoke cleared Wadsworth’s and Johnson’s divisions are off reorganizing (blown and retreated), with Griffin’s division back where it started from. As Meade wrote to Hancock after this attack, “Wadsworth division on Griffin’s left is driven in, and Crawford’s division has been called in so his line is thrown back considerably.” This note was part of the order for Hancock (Union IInd Corps) to attack the Confederate IIIrd Corps at Parker’s Store to let him understand that there was no Union support on his right.
This is the reality of a failed Corps attack in the Civil War and how it impacted other parts of the battlefield.
Assault Statistics
As stated earlier, I conducted this exact attack sequence ten times. The first run results are described and summarized in the text. The overall chance of success in the 10 runs is defined as Johnson-b experiencing a blown or retreated result during the first three assaults. Assault 4 versus Johnson-a and Assault 5 versus Rodes do not occur in every run. Johnson-b was successful defending his position 50% of the time against the second assault, hence the third assault in this short run matrix increased the success rate to 80%. Your results will vary, but likely not by much. You should try this on your own and see how it comes out as practice.
| Battle of Saunders Field | ||||||||||||
| Outcome | ||||||||||||
| Assault | Union Assault | versus Confederat defen | 1 | 2 | 3 | 4 | 5 | 6 | 7 | 8 | 9 | 10 |
| 1 | Wadsworth a | Johnson b | USA blown | USA retreat | USA blown | CSA retreat | USA blown | USA blown | CA: USA blown | USA blown | USA blown | CSA retreat |
| 2 | Wadsworth b | Johnson a/b | USA retreat | USA blown | CSA blown | CSA blown | USA retreat | CSA blown | CA: USA retreat | CSA retreat | USA blown | Pursuit |
| 3 | Griffin a | Johnson a/b | CSA blown | CSA blown | CSA retreat | Pursuit | USA blown | Pursuit | USA retreat | Pursuit | CSA blown | None |
| 4 | Griffin b | Johnson a | CSA blown | USA retreat | Pursuit | None | None | USA blown | None | USA retreat | CSA blown | CSA blown |
| 5 | Griffin | Rodes | USA retreat | None | USA retreat | USA blown | None | None | None | None | USA retreat | CSA retreat |
| Grant 3x casualty (30%) | * Grant Casualty Roll | * | * | * | * | ** | * | * | ||||
| 8 Success, 2 Failure vs | Johnson b | Success | Success | Success | Success | Failure | Success | Failure | Success | Success | Success |
Saunders Field Statistics: Note that the USA took the position 8 out of 10 times, better than the predicted 67%, Grant was a casualty in 3 of the 10 runs, and Rodes failed to hold the CSA second line of defense once (10%).
When one considers the combat narrative it describes itself. The two most interesting combat sequences were exemplified in run 7 where the first two assaults led to sequential CSA counterattacks that repulsed Wadsworth’s division followed by repulsing Griffin-b in the third Union assault. A glorious defense to be sure.
Run 10 is also notable in that it was the only example of a major USA breakthrough as Johnson’s division was beaten back with the pursuing Griffin-b achieving both his initial historical success, but unlike the real event penetrating Rodes second line of defenses. As a note of caution across the 10 runs there were eight casualty rolls for Grant of which 30% resulted in Grant becoming a casualty, so be advised using Grant or Lee to intercede in an attack can make you sad.
Another interesting point to be made across these ten combat vignettes is if we had decided to make two, not three assaults, we would expect to win 50% of the time. As it turns out, the Union succeeded 50% of the time, so the third attack significantly improved Grant’s combat outcomes.
This short ten run example can and will vary, you are rolling dice, and as the Medieval church doctrine stated, any game where you roll dice is the devil’s game, oh well. As in any game if you are rolling dice for combat, morale, and initiative understanding what to expect is what promotes good play. That said, the dice love no one and you will see and experience hot and cold dice, if that bothers you play chess (God’s game: no dice, no hidden information).
If we examine Union ammunition expenditure focused on the first three assaults, over four of the 10 assaults only two not three rounds of ammunition were expended. It is also important to note that on average each side had to expend ~4 rounds of ammunition from the 19 available. This is an unsustainable rate over even a four turn scenario. So, remember to use the hidden ammunition commitment counters and take risks where you can. Not every position needs to be defended to the last man. Simply stated you do not have infinite ammunition, so you have to pick your spots or expect to fight the last turn with no artillery support.
Math is math, so over any set of runs the dice will tend to move toward their expected mean, but a 67% chance of success also means there is a one in three chance of total failure. Just like Grant, expect to have your plans fail more than once during a battle.
As a closing thought, examine the Tactical Position probability of success chart and note that in Rebel Fury if you are attacking at less than the 7 column you should expect poor outcomes. This unusual combat system is intended to explicitly highlight the historical
narrative. Remember, unless you plan on making at least two or three attacks (flank) to take an enemy position you may want to consider not ordering the attack.
Conclusion
The Rebel Fury combat system is intentionally going in a different direction than my earlier designs on this topic with my intent to improve the historical narrative. Many will not like it but that’s fine as no one can tell anyone what to like. That said, if you are along for this ride hopefully knowledge on how to skillfully operate the Rebel Fury combat system will improve your results and enjoyment with the battle narrative it generates. As I said, if you are not committed to an attack, meaning making at least two and optimally three attacks on the same position, you should seriously consider not attacking, then disengaging to start a new maneuver sequence. Not every hill has to be taken, just be thoughtful about which ones you want your troops to die on. The unfortunate problem is there are very few situations where you can bloodlessly maneuver and win. It’s the Civil War, so expect to lose units and suffer the agony of defeat if you want to experience the joys of victory. To conclude, if you take the time to understand the Rebel Fury combat system, you will get to experience an American Civil War grand tactical combat narrative through a 19th century lens.
Appendix: Saunder’s Field Multiple Combat Summary
The bullet points below show values such as 7 v 9 which translates into a 7 tactical rating attack versus a 9 tactical rating defense. In all cases the first rating is Union, and the second rating is Confederate. In all cases the USA is using artillery support, attack support when available, and Corps/ Division integrity if available. The CSA is using artillery support, defensive terrain, and Corps/Division integrity when possible. The results shown represent the first assault run that is summarized in a later table. The results for each attack denote the outcomes on the Attack Results Table. All tables are from Rebel Fury (see player aid card).
- Combat Narrative: May 4th 10:30 AM (Wilderness Turn 1); historically, attack was at 1PM.
- Assault 1: 7 v 9; Wadsworth-a BLOWN (Union attack/artillery support + integrity)
- Assault 2: 7 v 9; Wadsworth-b RETREAT (Union attack/artillery support + both integrity)
- Assault 3: 7 (Grant + artillery + integrity) v 9; Johnson-b BLOWN, no Pursuit due to ZoC
- Assault 4: 6 (Grant + attack support + integrity) v 6; Johnson a BLOWN, Grant casualty check Griffin b advances two hexes (due to Grant in battle mode)
- Assault 5: 6 (Grant + artillery support) v 6; Griffin b RETREAT
- Probability that Assault 1, 2, or 3 succeeds; P Failure = (1-.29)*(1-.29)*(1-.29) = .35; P Success = 1-Failure = .67 or 67%

Author: Mark Herman

Great article from Mark on the Combat. I urge anyone to read and try this as it will help your tactics.