
This article continues the case study of the Battle of Issus started in the InsideGMT article Great Battles of Alexander: The Battle of Issus picking up the action with Game Turn 4. The Macedonians begin the turn with 41 RP lost and units worth 10 RP routed, well under their Withdrawal level of 135 RP. The Persians, on the other hand, are in trouble. They have lost 94 RP and have units worth 41 RP on the run. This combination puts them at their withdrawal level of 135 RP (pardon my arithmetic error in Part III). The Persians will need to be successful in most of their rally attempts to stay in the game and hope to generate enough offense to run up the Macedonian RP total, keeping in mind that Alexander is worth 70 RP if he meets his demise.
When playing against an opponent, most Persian players would ask to end the game. But in this solitaire endeavor we will soldier on and see if the Persians can survive the turn.
Game Turn 4
Elite Commander Initiative
Movement and Missile Fire Segment
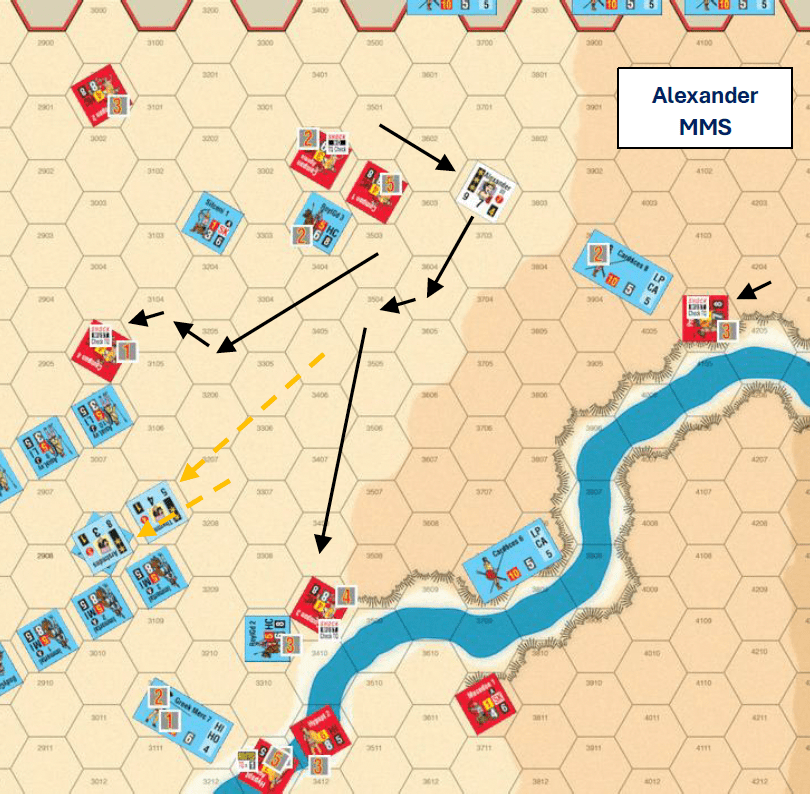
Alexander takes the EIO Player Turn with the intent to finish off the four Cardaces which will be more than enough to send the Persians over their withdrawal level.
His first order sends the Prodromoi (4605) against the flank of Cardaces 9 (5 MP – there were two facing changes); SHOCK MUST CHECK TQ placed.
The damaged Companion 2 (3601) is in the way, so Alexander uses his second order to move it out of the way and into a safer space in hex 3001 facing southwest (8 MP). His third order goes to Companion 4 (3901) which moves through the gap between the Cardaces to hex 3503 (8 MP)
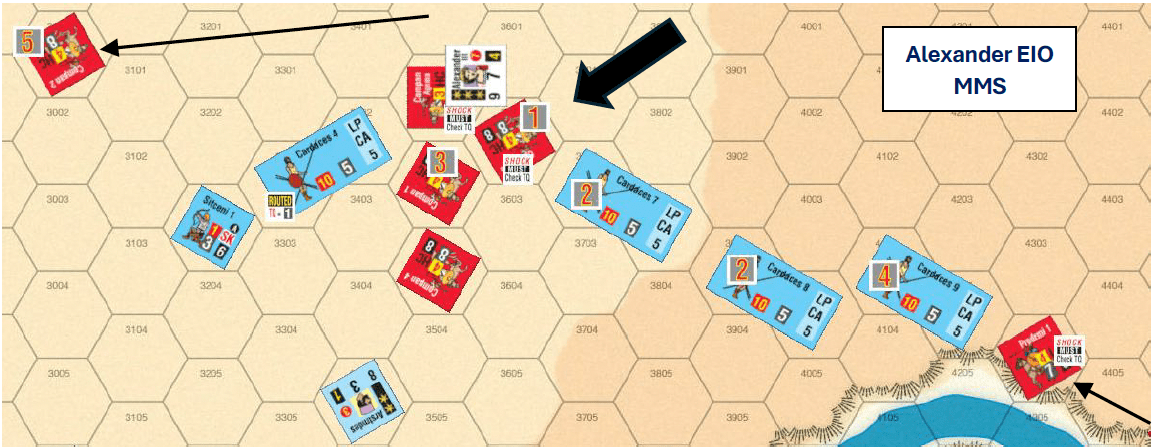
Order four goes Companion 1 (4002) which follows a similar route into hex 3502 (8 MP). The Agema (4101) is the target of order five which moves to hex 3501 to finish off Cardaces 4; SHOCK MUST CHECK TQ placed. Order six goes to Companion 3 (3900) which moves to 3602 facing Cardaces 7 flank (7 MP). SHOCK MUST CHECK TQ placed.
With his last order, Alexander moves to hex 3501 atop his Agema to avoid the potential of Personal Combat.
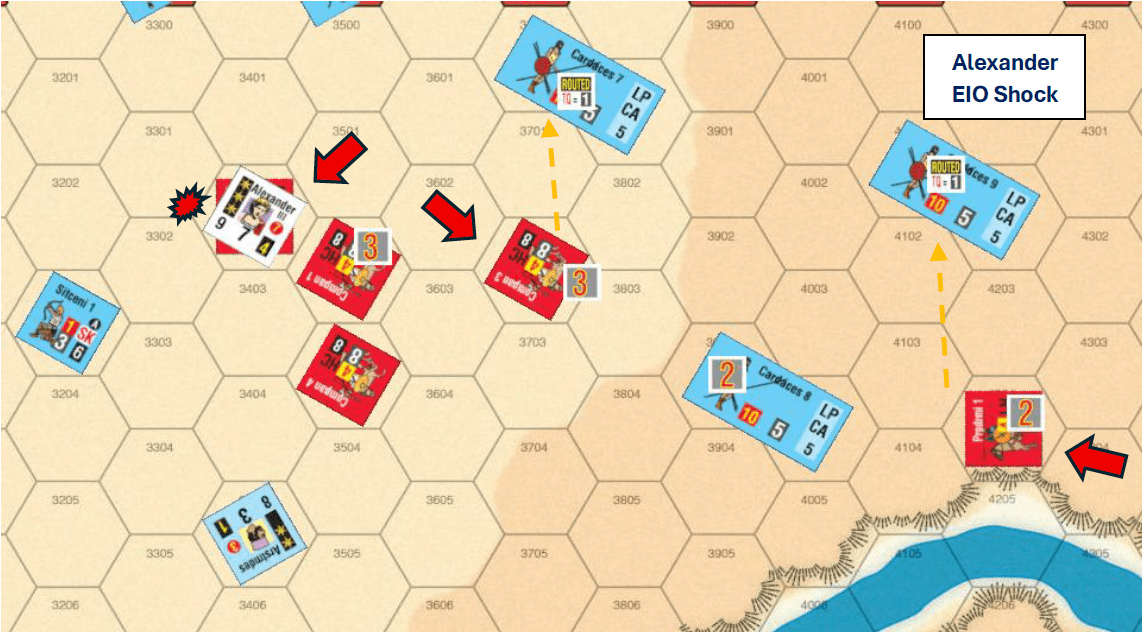
Shock Combat Segment
There are three combats. Starting from the left, the routed Cardaces 4 makes the first Pre-Shock TQ check, the Agema doesn’t. The Cardaces fail and are eliminated and the Agema with Alexander advances into hex 3402. Companion 3 and Cardaces 7 are unaffected as are the Prodromoi and Cardaces 9.
Companion 3’s combat is resolved on Shock CRT column 7 (a left shift for Size) and Attack Superior due to its position superiority. The result is a typical 2(2) adjusted to 2(4). The Prodromoi’s combat is resolved on Shock CRT column 6 (a left shift for Size) and Attack Superior due to its position superiority. The result is a 2(3) adjusted to 2(6). This is a Breakthrough, but the extra hits are irrelevant.
The collapse has Cardaces 7 rout move to 3900-3801 and Cardaces 9 rout move to 4101-4102. Companion 3 advances into hex 3702 and changes facing southeast, while the Prodromoi advances into 4204 changing facing eastwards.
Rheomithres
The rout and elimination of the Cardaces have the Persians poised to exceed their Withdrawal level this turn. To stay in the game, the Persians will need some successful rallies and drive up the Macedonian RP total. Rheomithres is in no position to do either so orders himself and the stacked Asia Levy to move to hex 4613, increasing the distance from the Thracian LC. He forgoes his second order, passes, and declines a Momentum attempt.
Darius
The Persians go with Darius (2810) next. He orders himself to move to hex 2105 (9 MP) to place the four routed units that will exit the map this turn in range. He then issues a Rally order to Hyrcania 2 (2007). The attempt fails (6 DR) and Hyrcania 2 rout moves to hex 2005. Next he tries to rally Hyrcania 1 but fails again (8 DR) eliminating that unit. The two routed Cardaces on the Persian right are within range of Aristomedes, so rather than give Alexander a Trump opportunity, Darius declines a Momentum attempt.
Aristomedes
Aristomedes is next up. His first order is a Rally to Cardaces 7. A 9 DR eliminates the unit. Hoping for better luck, order two goes to Rally Cardaces 9. Here a 5 DR is another failure with Cardaces 9 rout moving two hexes leaving the map (that it is not the entire unit is immaterial) and is eliminated.
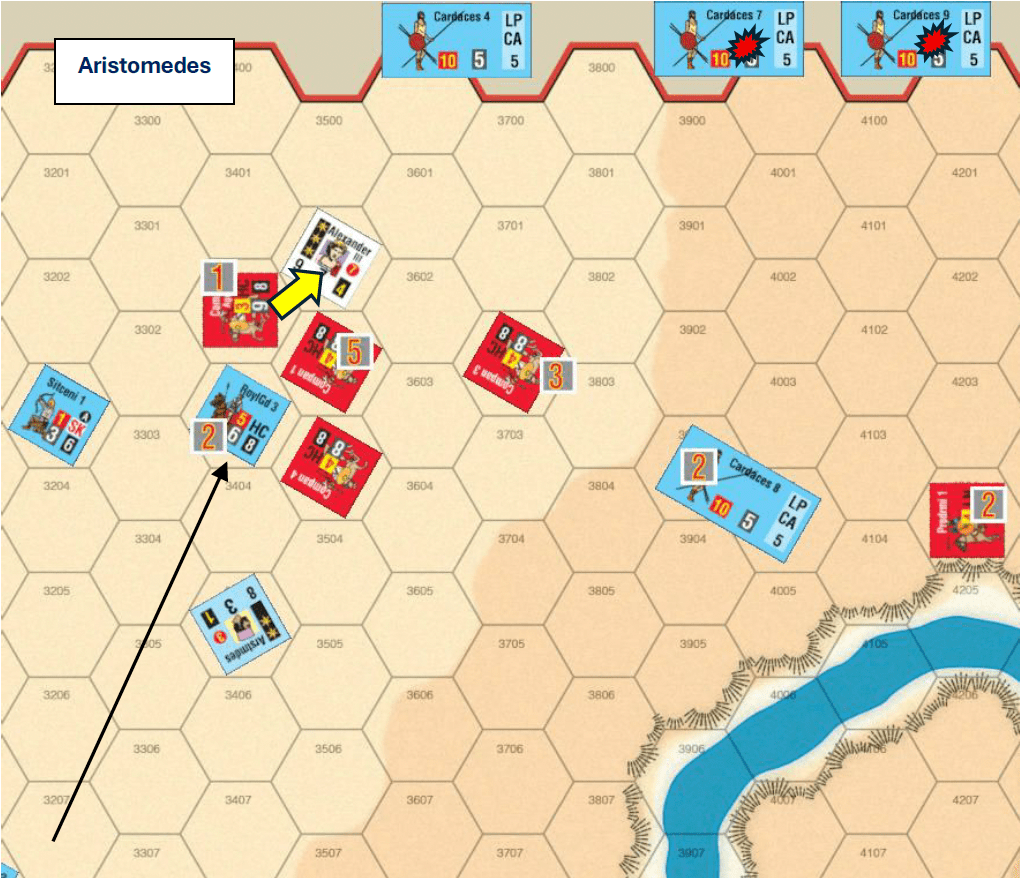
With 36 RP eliminated so far this turn, the Persian RP total stands at 130 – 5 RP shy of the Persian withdrawal level. The three routed units in the Persia right that will leave the map total 15 RP so unless all are rallied it will be over for the Persians. The Persians will need to eliminate 90+ RP to make it close and there is one target that could close the gap quickly – Alexander who is worth 70 RP. Aristomedes’ last order moves Royal Bodyguard 3 (3207) to 3303 where Alexander withdraws to 3501 (there is but a 1 MP difference between the two units) and on to 3403. SHOCK MUST CHECK TQ placed. No point in risking Alexander even with a commanding lead.
The Royal Bodyguard’s combat is the only one. All three units pass their Pre-Shock TQ checks. The Macedonian’s choose Companion 1 for the Clash of Spears (Alexander, 9.15) so the combat is resolved on Shock CRT Column 7 (no shifts – the SRD is rounded in the attackers favor here) with no superiority. The result is 2(3). The Agema incurs 1 Hit while Companion 2 incurs 2 Hits since it was the unit used in the Clash of Spears determination (Alexander, 10.13). There are no routs or Collapse checks, so the Shock Combat segment is complete.
Within striking distance of Alexander (7 MP) for a Personal Combat, Aristomedes makes the Momentum attempt but fails (5 DR).
Thymondas
Movement and Missile Fire Segment
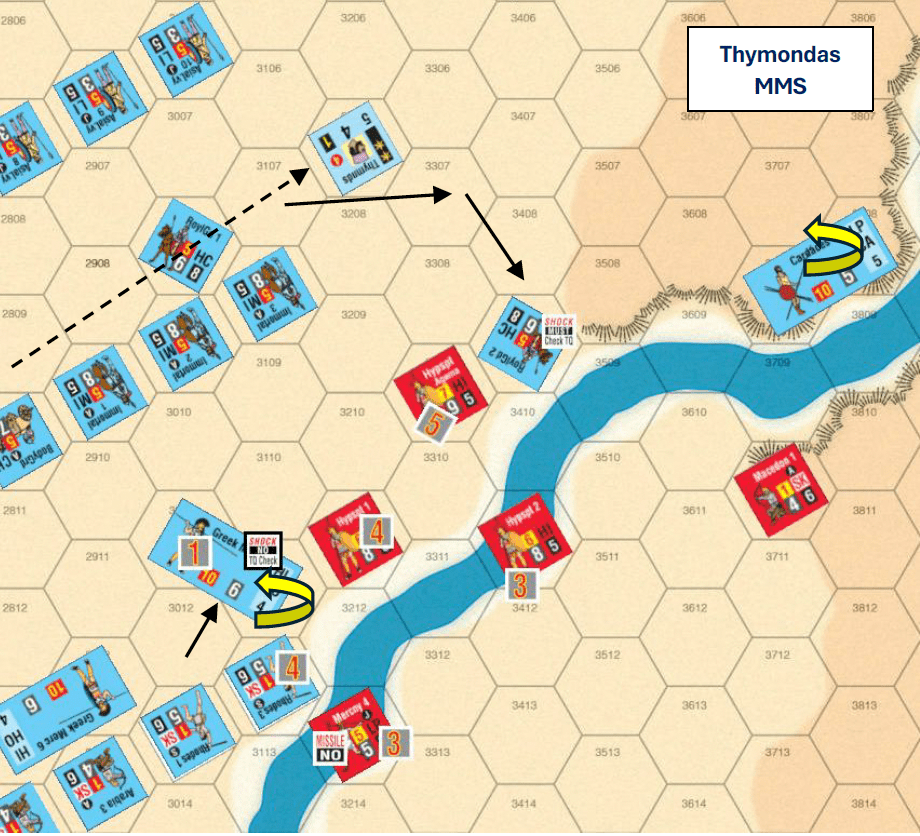
With the two Cardaces on the Persian right exposed and sure to be eliminated, trying to rally the routed units on the left seems pointless. Resigned to the almost certainty that the Persians will reach their withdrawal level, Thymondas (2814) will attempt to drive up the Macedonian RP total to close the gap. First order (Move) goes to Greek Mercenary 7 (3111-3012) which reverses facing and pivots toward the east, incurring a Hit for the pivot. There is no reaction facing or shock marker placed since the move was not from a non-adjacent hex (Alexander, 7.16, 7.31). With his second order, he moves to hex 3207 (8 MP). Order three goes to Cardaces 6 (3708-3808) which reverses its facing (3 MP) to protect its flanks. His last order (Move) goes to Royal Guard 2 (3107) which moves with some facing changes to 3409 (7 MP) facing the Hypaspist Agema’s flank. SHOCK MUST CHECK TQ placed.
Shock Combat Segment
The Greek Mercenaries are in Thymondas’ range so on goes a SHOCK NO TQ CHECK. The Royal Bodyguard and Hypaspist Agema both pass their Pre-Shock TQ checks. On to the rest of the Shock sequence.
The Greek Mercenary combat is resolved first. The combat is resolved as a flank attack on Shock CRT Column 10 (there is so SRD adjustment) and is Attack Superior due to the Greek Mercenaries’ position superiority. The result is a 2(2) adjusted to 2(4). The Royal Bodyguard’s combat is also resolved as flank attack on Shock CRT column 9 (no SRD adjustment since the attacker moved adjacent) and is Attack Superior due to the Royal Guard’s position superiority. The result is a 3(2) adjusted to a 3(4). Both defenders rout. Hypaspist 1 rout moves to hex 3312 skirting the Rhodian slinger’s ZOC. The Hypaspist Agema rout moves to hex 3311. The Greek Mercenaries advance into hexes 3110-3211 while the Royal Bodyguard 2 advances into hex 3309 and faces west.
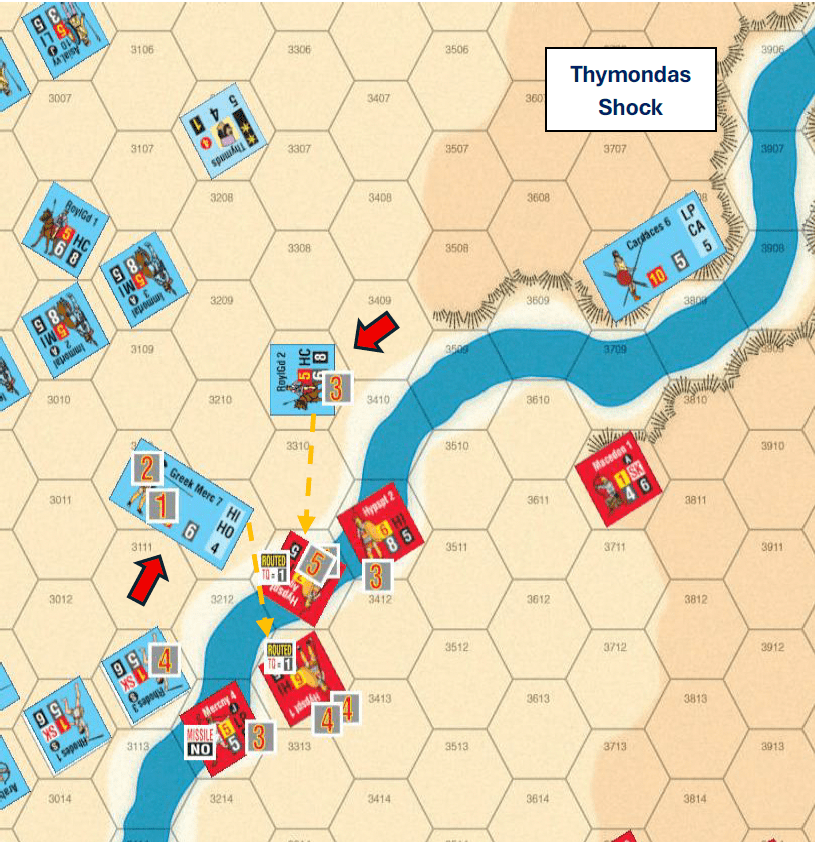
Now for the Momentum attempt … a 4 DR is good enough for a success. Now, what will the Macedonians do? Given that the end of the game is certain and that the Macedonians have a comfortable lead in RP, risking a failure (20% for Alexander) or losing the Momentum chance for the two other Macedonian leaders is worth limiting the Persian opportunities to a single Orders Phase for Nabarzanes. Alexander succeeds in the Trump attempt (3 DR). Aristomedes is Finished.
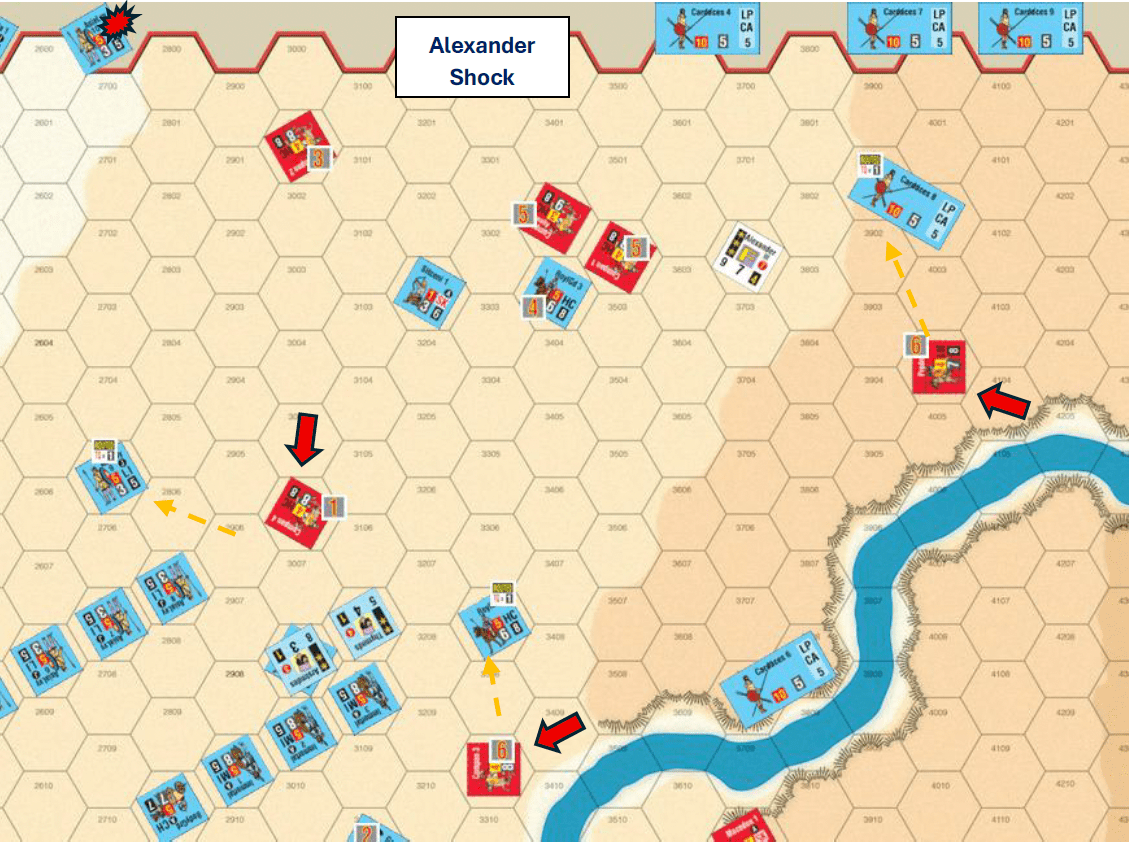
Alexander
Movement and Missile Fire Segment
Alexander’s first order (Move) goes to the Prodromoi (4204) which moves to 4104 incurring a Hit for moving again this Game Turn. SHOCK MUST CHECK TQ placed.
His second order (Move) goes to Companion 3 (3702) which moves to 3604 where Aristomedes withdraws to 3305. The unit continues to 3504 with Aristomedes withdrawing to 3205, then continues to 3409 (8 MP) with Thymondas withdrawing to 3107 when the Companions enter 3409. The unit incurs a Hit for moving again in the same Game Turn. The Royal Bodyguard (3309) declines to react since the Hit cost is not worth changing his opponent’s attack angle from rear to flank. SHOCK MUST CHECK TQ placed.
Order three (Move) goes to Companion 4 which moves with two facing changes to 3005 (7 MP) incurring a Hit for moving again during this Game Turn. On this journey Aristomedes withdraws four times ending up with the Royal Bodyguard in hex 3008. A reaction by the Asia Levy would almost certainly result in an instant rout, so that unit stays put. SHOCK MUST CHECK TQ placed.
Order four removes two Hits from Companion 2 (3001). Order five goes to the Agema which changes its facing toward the Persian Royal Bodyguard (Alexander, 7.25) incurring a Hit for moving again during this Game Turn. SHOCK NO TQ CHECK placed (Alexander, 7.33). In this situation, Shock is optional.
With order six Alexander moves to 3702 (2 MP) and uses his last order to remove two Hits from the Agrianians in hex 4505.
Shock Combat Segment
The Shock combats are relatively isolated so each will be resolved in its entirety, moving left to right, beginning with Companion 4. Companion 4 passes its Pre-Shock TQ check (DR 2) while the Asian Levy fails (DR 6) and routs. The unit’s most direct path to the retreat edge is blocked by Companion 4 and its ZOC, so it changes its facing and moves through the Asia Levy in 2906, changing facing again, and ending its rout move in hex 2806. Unfortunately, a DR 6 on the passed through Asia Levy unit is enough to rout that unit, which must avoid Companion 4’s ZOC and move through the routed Asia Levy 10, eliminating it – the Persians now have 133 RP. Companion 4 advances into hex 3006 and maintains its current facing.
The Agema is up next. There is no Pre-Shock TQ check. The Shock will be resolved on Shock CRT column 6 (a shift left due to the Size). A DR 2 inflicts 3 Hits on the Agema (now with 5 Hits) and 2 Hits on the Royal Guard (now with 4 Hits). The two units remain locked in combat.
Companion 3 and Royal Guard 2 both pass their Pre-Shock TQ checks. The combat will be resolved on Shock CRT column 9 due to the Rear attack – Companion 3’s movement offset its Size disadvantage. A 7 DR inflicts 6 Hits on the Royal Guard due to the attacker’s Position Superiority and 2 Hits on Companion 3. The Royal Guard unit changes facing and rout moves to hex 3307. Companion 3 advances into hex 3307 and changes its facing toward the Persian retreat edge.
Lastly, there is the Prodromoi combat. The Pre-Shock TQ checks inflict 2 Hits on the Prodromoi (9 DR) and none (4 DR) on the Cardaces. The flank attack will be resolved on Shock CRT column 6 (a shift left for Size) with Attack Superiority. The Macedonian 0 DR inflicts 4 Hits on the Cardaces and 3 Hits on the Prodromoi. Both combatants have exceeded their TQ by one. The Prodromoi can advance without incurring any Hits, so the defending Cardaces rout, and the Prodromoi has its Hits reset to 6. The Cardaces rout move takes it to hexes 3901 and 4002 maintaining its facing. The Prodromoi advance into hex 4004 maintaining its facing.
The Macedonian player could have Alexander make a Momentum attempt but given that the Persians will exceed their Withdrawal level, he declines. Alexander is Finished.
Nabarzanes
This is the Persian player’s last chance to do some damage. Nabarzanes’ first order goes to the Bactrians in hex 2023 which uses its superior MA to move out of the Phalanx’s ZOC and enters hex 2024, SHOCK MUST CHECK TQ placed. His next three orders move Bacteria 10 to hex 2321, Bactria 8 to hex 1922, and Bactria 7 to hex 1824. All incur 1 Hit for the river crossing. Last order goes to Hyrcania 5 which moves after a couple of facing into hex 2023 facing the rear of the Amyntas Phalanx. Hoping for a low Missile Fire DR (there is a +2 DRM for moving and the target type) which would rout and eliminate the Phalanx (it has nowhere to go), the unit comes up empty with 9 DR. The archers are now Missile low.
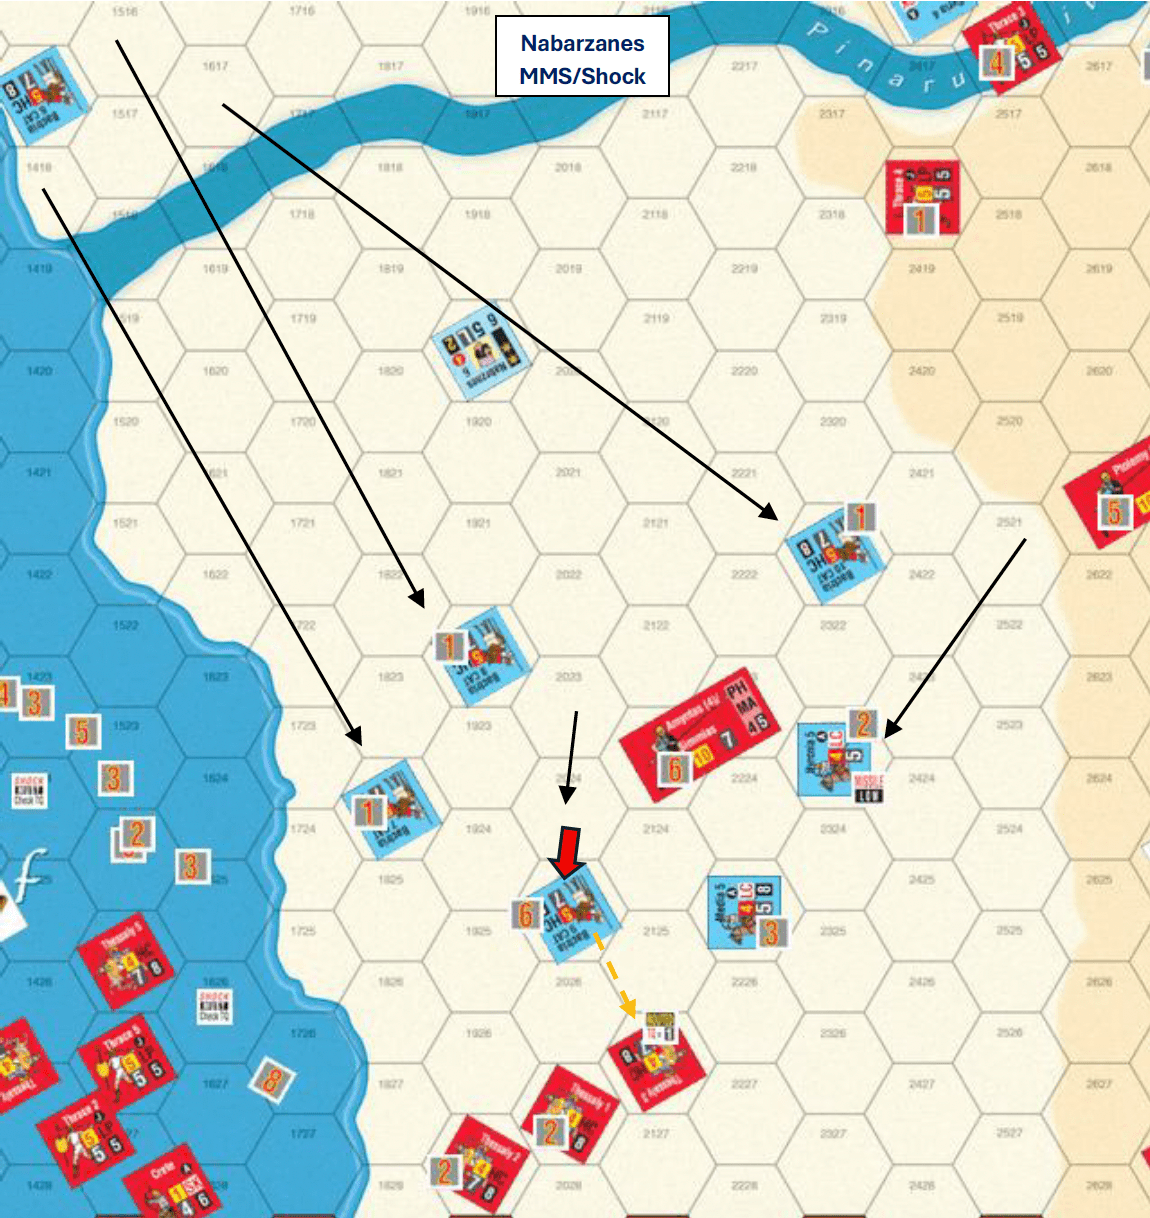
There is one Shock combat. The Bactrians and Thessalians both come away unscathed from the Pre-Shock TQ with 7 DRs. The combat will be resolved on Shock CRT column 8 – the Bactrians gaining a 1R due to their Size advantage. Another 7 DR inflicts 2 hits on the Bactrians and 3 hits on the Thessalians, enough to rout them. That unit rout moves to hex 2126 skirting the Median archers ZOC. The Bactrians advance into hex 2025 maintaining its facing.
With Alexander’s Trump, Nabarzanes and the Persians are finished.
Parmenion
Parmenion will go next. More than enough Persian units will rout off the map to put the Persians over their Withdrawal Level, so there is no point to engage in any unnecessary offensive operations. There are routing Macedonian units to be rescued so that is the focus. Parmenion’s first Order goes to Rally Thessaly 3 (2126). A 9 DR eliminates the Thessalians (Alexander, 10.27) adding 7 RP to the Macedonian total.
Hoping for better luck, order two is another Rally this time with Thrace 3 (2727) as the target. A 6 DR is just enough to rally the Thracians which are given 2 Hits (5 DR on the Rally Table), its ROUTED marker flipped to its RALLIED side, and a MISSILE NO marker placed. Parmenion’s last three orders remove Hits from the Ptolemy Phalanx, Thessaly 1, and Thessaly 2. Parmenion is Finished.
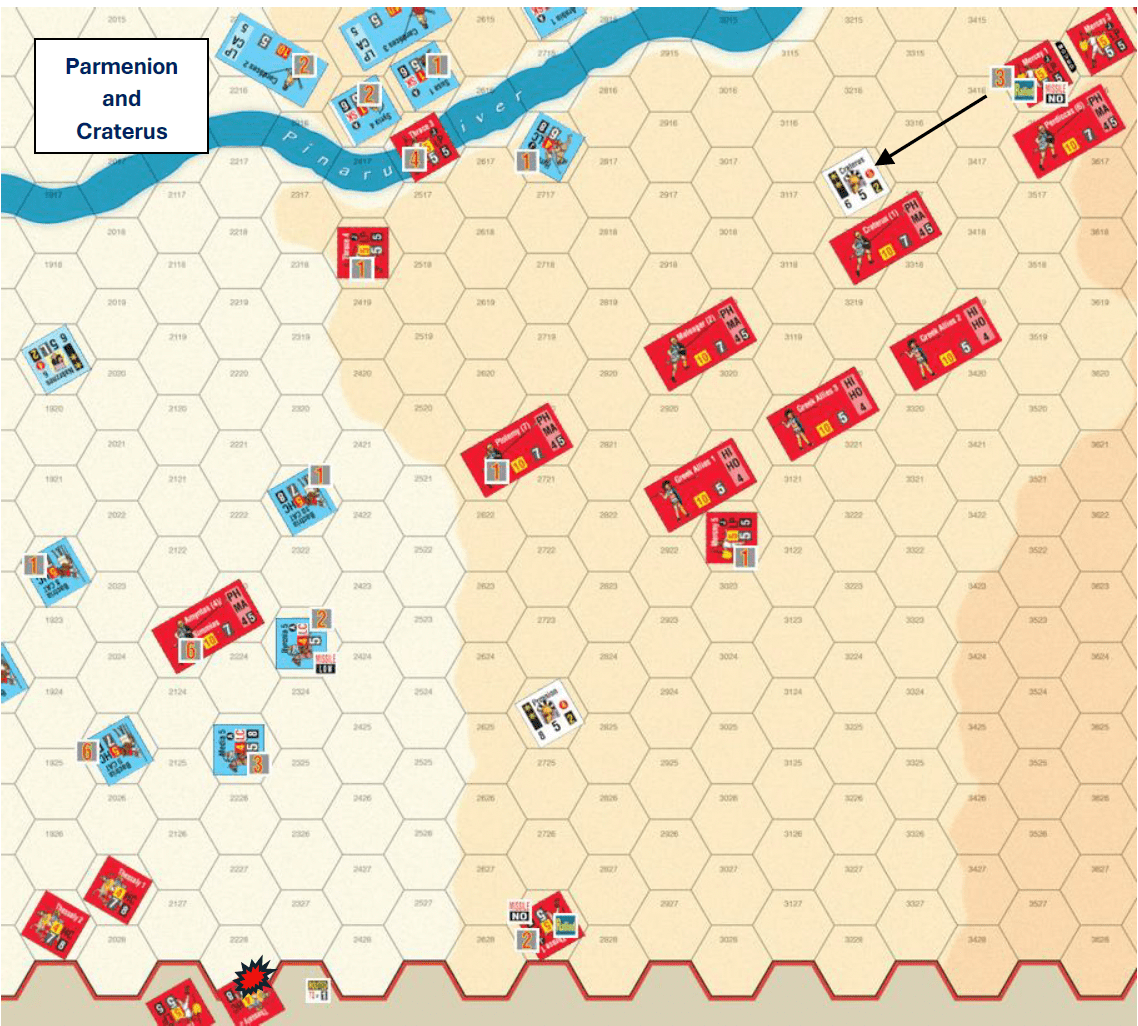
Craterus
Craterus is last to go. Craterus has three Routed units in range. Unfortunately, the Rhodian Slinger in hex 3112 has missiles and an LOS to both routed Hypaspists- the Mercenary Peltast in hex 3213 is in lower terrain then both firing unit and target so does not block the LOS – so rally is not possible. Craterus’ first order goes to rally the Mercenary Peltast stacked with him. A 2 DR does it, so its ROUTED marker flipped to its RALLIED side, a MISSILE NO marker placed, and the unit rotated is 180 degrees to face the Persians. A 7 DR on the Rally Table leaves the peltasts with 3 Hits.
Craterus moves with his second order to hex 3217 to put three Macedonian units with Hits in range. Orders three to five remove Hits from the Ptolemy Phalanx, the Greek Allies, and the Mercenary Peltasts. Craterus and the Macedonians are Finished.
Rout and Reload Phase
The RALLIED markers are removed from the two Peltasts (2727 and 3515).
Persia 2 on the far left side of the map rout moves first, exiting the map at a cost of 6 RP. Hyrcania 2 follows suit for another 6 RP. Asia Levy 3 has enough MP to exit as well – 3 RP. Asia Levy 4 (2705) ends rout move on the map. Royal Guard 2 (3307) skirts the Agema’s ZOC, passes through the Sittaceni Archers and ends its move hex 3200. The archer’s pass through DR is a 2, so it receives a minimum 1 Hit.
The Macedonian Hypaspists are next with the one closest to the retreat edge moving first. The nature of the hex grid forces the Hypaspist to end its move atop the Craterus Phalanx, so it moves on to hex 3318. A 6 DR gives the Craterus Phalanx 1 Hit. The Agema then moves, ending in hex 3315.
Last to go is Cardaces 8, which exits the map at a cost of 10 RP.
I will skip the missile reload and leader flip and go right to the Withdrawal Phase.

Withdrawal Phase
The Persians lost 25 RP in the Rout and Reload Phase bringing their total up 158 RP, exceeding their 135 withdrawal level. The Macedonian total remained at 48 RP. The win goes to the Macedonians.
End of Game Turn Commentary
The Persians had a steep hill to climb to stay in the game and came up short. The rout of the Cardaces in the Macedonian EIO followed by the abysmal attempts to rally by Darius and Aristodemus sealed their fate. The Persians did receive a bit of satisfaction in routing the Macedonian Hypaspists.
The Macedonian leadership advantage primarily in the person of Alexander dominated the game. Guaranteed two Orders Phases and good chance at a third, Alexander was able to use his superb Companion cavalry to move, fight and recover in a single turn. The Persians were too late getting the Royal Guard and Immortals into the fight. It would have been better to move these forward and leave the Cardaces to their fate. The Persians simply do not have enough orders to do both.
The Persian infantry along the river did their job well despite some favorable Macedonian die rolls. The breach by the Hypaspists was closed and those fine fellows put to flight. The Macedonians wisely left their phalanxes and allies in their starting positions. The terrain disadvantages are just too great for them to be effective.
The Persian assault on the Macedonian left came up short. Nabarzanes needed a Momentum Orders Phase or two to get his Bactrians into play. His Light Cavalry did good work disrupting the Macedonian left but suffered heavy losses at the hands of the Thessalian heavy cavalry.
Both sides’ battle plans were sound; the difference was Alexander who earned the title of “the Great”.
Previous Articles:
Great Battles of Alexander: The Battle of Issus (Part I)
Great Battles of Alexander: The Battle of Issus (Part II)
Great Battles of Alexander: The Battle of Issus (Part III)

Author: Alan J. Ray

Excellent play through. Covers pretty much every aspect of the game and gives a solid strategy to learn from as well.